How to run a Perl Script from a vCenter Orchestrator Workflow
![]()
PERL Logo
Concepts Covered In this tutorial
The following concepts will be covered:
- Enabling Local Process execution
- Filesystem rights configuration
- Use of the “command” object to execute a locally hosted PERL script
Tools Used
The following tools are used for this tutorial:
- vCenter Orchestrator 5.1.1 Appliance (Perl is pre-installed in the appliance)
- Simple Perl Script configured with at least 1 input parameter
vCenter Orchestrator Configuration
vCO requires special configuration considerations when dealing with local commands and filesystem access. The default settings of a vCO server limit access to specific local folders and prevents the execution of local processes. Local processes include scripts and commands hosted on the vCO Server.
Configure vCO to allow execution of local processes
- Go to /app-server/server/vmo/conf
- Edit the vmo.properties file and add (if not already done) the following line to enable
com.vmware.js.allow-local-process=true
Configure vCO to allow filesystem access to scripts folder
- Go to /app-server/server/vmo/conf
- Edit (or create if it does not yet exist) the js-io-rights.conf file
- Assuming a folder name of “orchestrator” on an appliance, enter the following (adjust as desired for Windows):
+rwx /orchestrator
- Add additional folders as desired. The line above adds (r)ead (w)rite e(x)ecute access to the /orchestrator folder to the vCenter Orchestrator Server service.
Once the two files have been edited as described above, restart the vCenter Orchestrator Server service.
Script Preparation
Prepare a simple script as an initial test to confirm things are setup properly. Once a simple script such as the example here is working, you can then try out more complex scripts/programs.
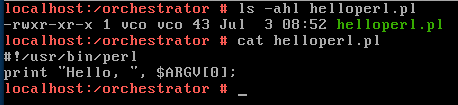
- Create a new file named helloperl.pl in the /orchestrator folder
- If using the appliance, be sure to set ownership on the file to the vco user/group: chown vco.vco /orchestrator/helloperl.pl
- Also make the file executable: chmod 755 /orchestrator/helloperl.pl
|
|
You now have a simple script and vCO configured with the ability to access and execute that script so it is time to create a workflow to do just that.
Create Workflow

Open the vCenter Orchestrator Client and create a new workflow called “Hello Perl”
Please use this exact name as it will be the subject of my next tutorial (described in the Summary and Next Steps section at the bottom of this tutorial.)
Add Scriptable Task
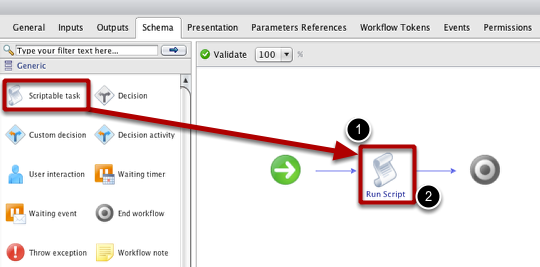
- Add a single scriptable task to the workflow
- Rename it from “Scriptable task” to something like “Run Script” if desired for better appearance
When complete, it should look like the screenshot above.
Create/Bind Inputs and Outputs
Since this is a simple test workflow, it will take two inputs and produce two outputs. We’ll prompt for the name of a script and another input for the parameters. For this example we will have a single paramter. For a more complex script, you could dynamically build up a number of parameters in elements in earlier parts of a custom workflow, storing them in a workflow attribute and then bind that attribute as an input to the “run script” scriptable task.
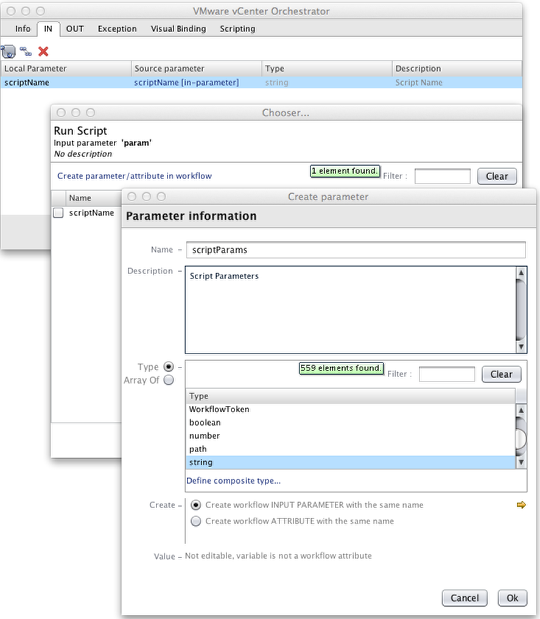
Click on the Scriptable task and add the following inputs:
- scriptName (string) - Create New Workflow Input Parameter
- scriptParams (string) - Create New Workflow Input Parameter
Add the following Output:
- scriptOutput (string) - Create New Workflow Output
- scriptResult (number) - Create New Workflow Output
Confirm Bindings

Click on the “Visual Binding” tab of the “Run Script” to confirm the bindings are as shown in the above screenshot.
Set Presentation
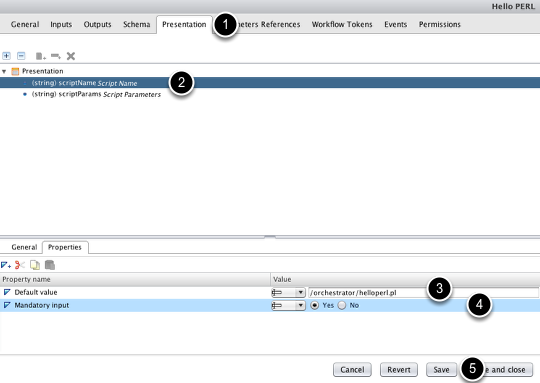
- Click on the “Presentation” tab, then choose the “scriptName” input
- Add a new property to the input for default value
- Set the default value to “/orchestrator/helloperl.pl”
- Add a new property to the input for “Mandatory” and set to “Yes”
- Click “Save”
Code the Scriptable Task
Insert the following code into the scriptable task:
|
|
How to use the output
The results and output could be passed to another scriptable task for parsing and additional actions if desired. In that case, you would need to move the “scriptOutput” and “scriptResult” Output Parameters to Attributes.
Save, Description, Version
This completes the creation of the workflow so it should be saved.
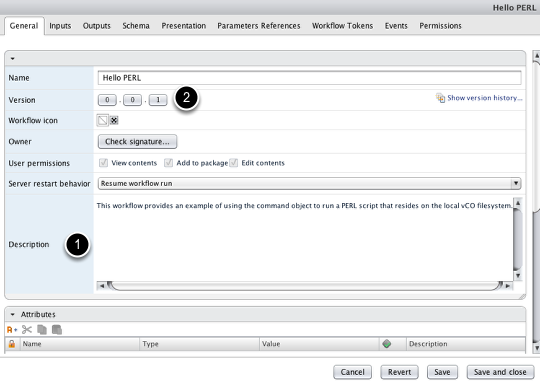
When saving a workflow, be sure to provide a nice description (1) so that it is obvious what the workflow is designed to perform. Here, we’ll add the following:
This workflow will execute a simple Perl script that takes a single parameter. The output of the workflow should be the result code and any script output generated.
In addition to a description, you should version your work (and increment the version each time you update the workflow.) Go ahead and do that now (2). When you set the version, you’ll be prompted for a version comment. I typically start with something like: Initial Version.
Save and Close the workflow now, we’re ready to run it.
Execute the Workflow using vCO Client
At this point, you should still have the vCO Client open and the “Hello Perl” workflow selected.
- Right-Click on your workflow and select “Execute” (or use one of the other methods to start the workflow)
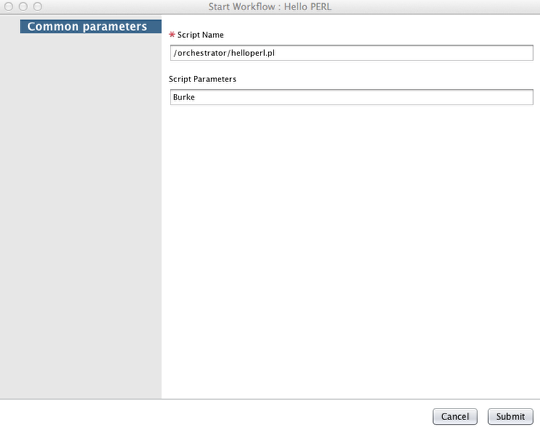
- The “Script Name” should have the default value that was specified at design time
- Enter your first name in the “Script Parameters” box
- Click “Submit”
View Results: Variables
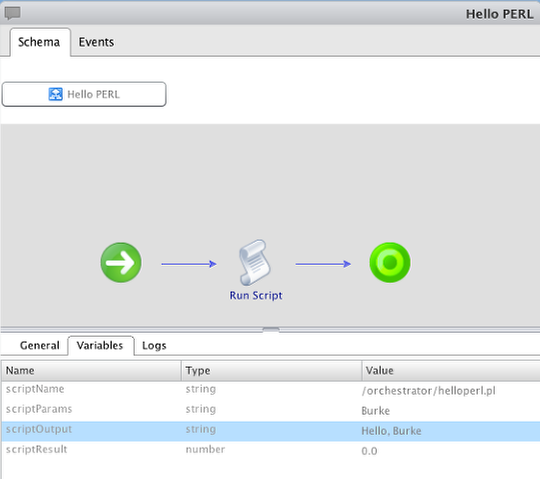
After a successful run of the workflow, your results should appear similar to the above screenshot.
View Results: Logs
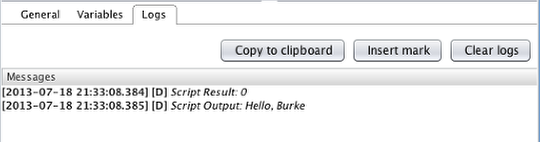
After a successful run of the workflow, your results should appear similar to the above screenshot.
Summary and Next Steps
This tutorial has provided you with a foundation for utilizing existing scripts and programs that may reside on your vCO server. Although this example was done on a vCO appliance, the same principals and steps apply to the Windows version of vCO. Leveraging existing Command Line utilities within workflows is an excellent integration example for systems that may not have a proper API available.
For example:
Windows systems have .exe files such as the Active Directory tools dsadd.exe, dsmove.exe, dsquery.exe, etc… Some IPAM software, portals, or other misc systems may ship with a set of Perl, Python, or other management scripts
Any of the above may be utilized in the same way we have run the sample Perl script in this tutorial. In my next tutorial, you’ll learn how to access and run this “Hello Perl” workflow via the REST API !
- Locate the api documentation found on your vCO server
- Find the workflow
- Identify inputs, outputs, and the proper format
- Work with XML based REST
- Learn to force JSON for the input/output of REST Queries
