Create a simple vCO self service VM Provisioning Portal - Part 2
This second tutorial assumes you have completed part 1 and use the Provision VM workflow.
Concepts covered in this article include:
- How to create a Workflow using subworkflows
- How to map inputs, outputs, and attributes
- How to use user interactions
- How to do basic presentations
- How to use validation presentation properties
- How to handle exception and write to the event log
- How to use vCO Server and System objects in scriptable boxes
- How to use the API search
- How to launch a Workflow from the vCenter Orchestrator Client
- How to launch a Workflow from a webview, using the vCenter Orchestrator Weboperator
- How to set rights on workflows
- How to set up the vCO mail plug-in
Development of the "Request VM" workflow - building blocks
In the vCO client, select the Workflows tab. Select your workflow category.

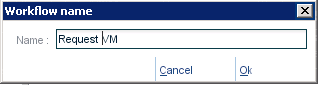
Right click / New workflow / Name it "Request VM".
Edit the selected workflow (Right Click / Edit or Ctrl E).
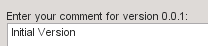
As a best practice, click on the last digit of the version to and provide an initial comment, Click OK.

Provide a description for the workflow such as "Request, approve, provision a VM".
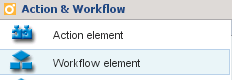
Click on the Schema tab. In the "Action & Workflow" tab select workflow and drag and drop on the schema.
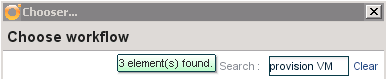
In the search box type in "provision VM". This will be one of the workflow building block for our new workflow. Double click on it (or Click to select and use the Select link).

We are now going to create our Request VM workflow input so the requester can select a template to provision from. To do so go in the "Inputs" tab.
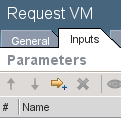
Click on the yellow arrow to create a new input. A name will be provided by default.
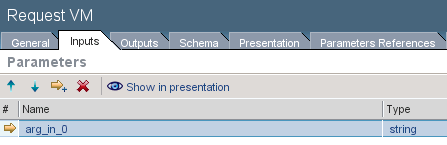
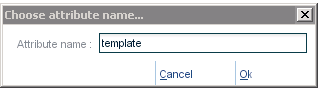
Click on it to rename it "template".
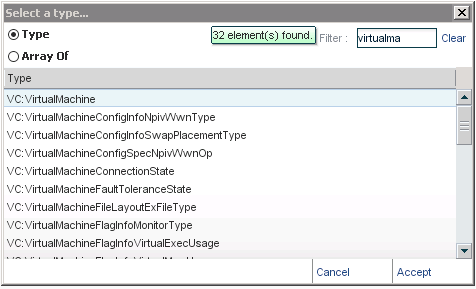
Click on the Type "string" link. Use the filter with entering "VC:virtualMachine" and select it (you may have to use the scroll bar to get to it since there are a lot of types starting with the same string). Double click on the type or use the "Accept" link.
Double click in the description tab for the template input. Set it to "Operating System".

We have the basics for requesting a VM and provisioning it, now we need to include an approval process.
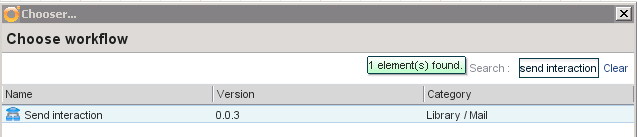
Get back to the Schema tab and then on the "Action & workflow tab, drag and drop "Workflow element" on the schema. Type "Send interaction" in the search filter. Double Click on the workflow.
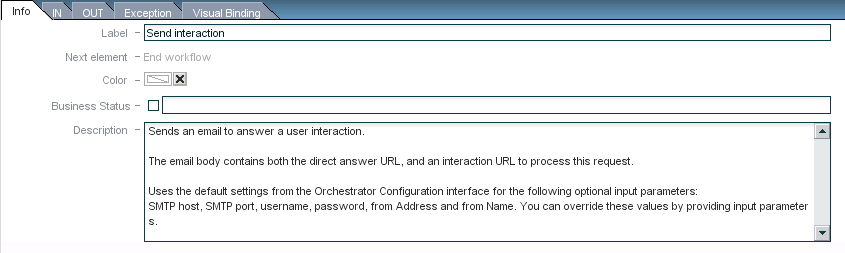
Back to the schema, now the Send interaction box should be selected. On the bottom pane, info tab you will see the description of this workflow.
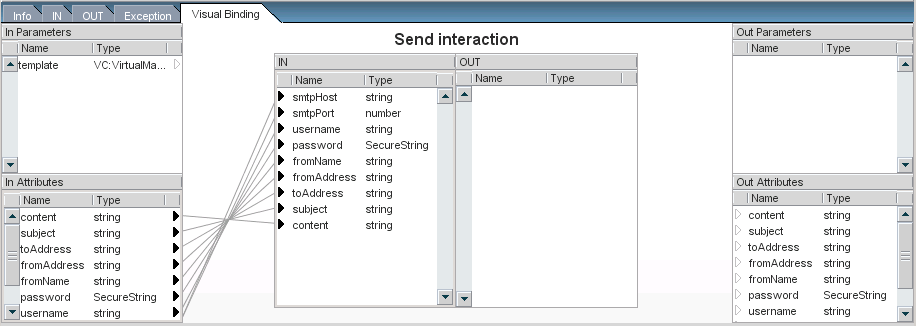
Click on the visual binding tab. Drag and drop each "Send Interaction" inputs in the "in Attributes" (bottom left) and click the "Ok" link. Do not set the values of these. We will default some of these inputs with our Request VM attributes. Once done you should have all the Send interaction IN elements linked (depending on which order you drag and dropped them the links may appear differently)
Click on the General tab. The Send interaction workflow need either most of these inputs to be filled or only part of them if you have pre-configured the vCO email plug-in. We will go for the second solution. Double click in the following string attributes Values and set the approver address, the subject and the content of the notification.

Click on the "Save link". It is good practice to save changes regularly since the Workflow is edited in memory and committed to the server when saving. If for any reason you would loose your network link to the server you would loose the changes since the last save.
We are now going to check your vCO mail plug-in configuration.
Mail plug-in configuration
If you have already setup the mail plug-in you can skip this section
For this open a browser, type in the url for the configuration (default is http://server:8282), authenticate (default is vmware / vmware).Click on the Mail tab. (you can also access this page by clicking your vCenter Orchestrator Configuration icon)

Make sure the "Define default values" checkbox is checked. Enter the right SMTP host and port for your environment.
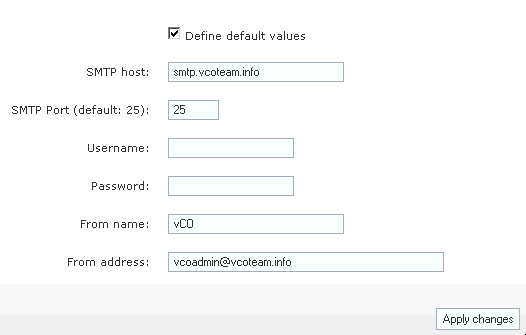
Click apply changes. You can log out and get back to the vCO client.
Development of the "Request VM" workflow - building blocks continued
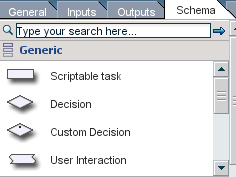
We now have what is needed to send the user interaction notification. We now need the interaction element. Click on the Schema tab, Generic tab, select "User Interaction", drag and drop it on the schema.
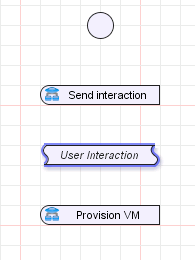
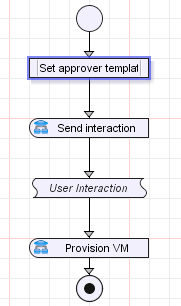
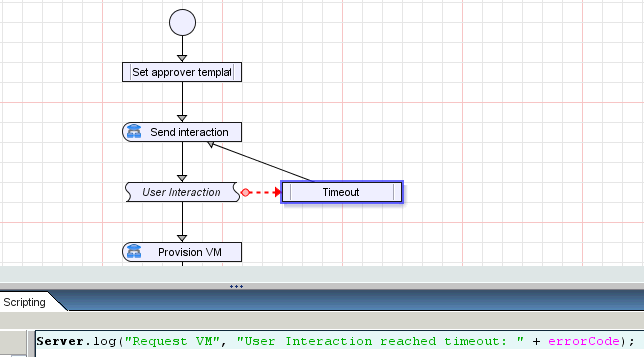
At this point your schema should look similar to this. If you do not have the same order move the boxes around.
Click on the Attributes tab of the user interaction. Click on the "not set" link of the security group.

Click on the "Create parameter / attribute in workflow".

Name it "approverGroup". Click on the "not set" link of the Value field.
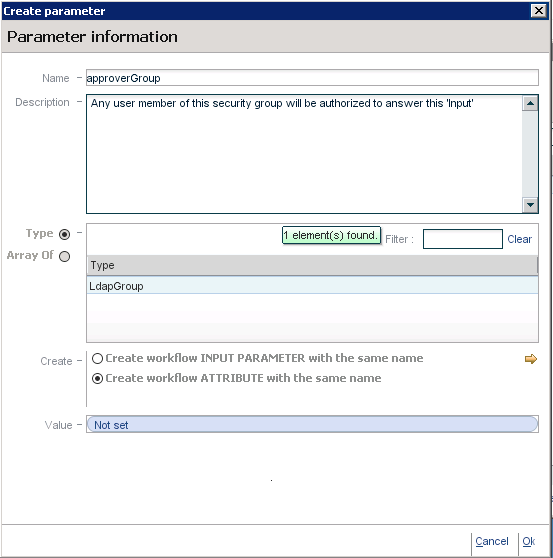
Use the search field to find the LDAP group in which the request approvers have to belong to. Double click it, Click the Ok link.

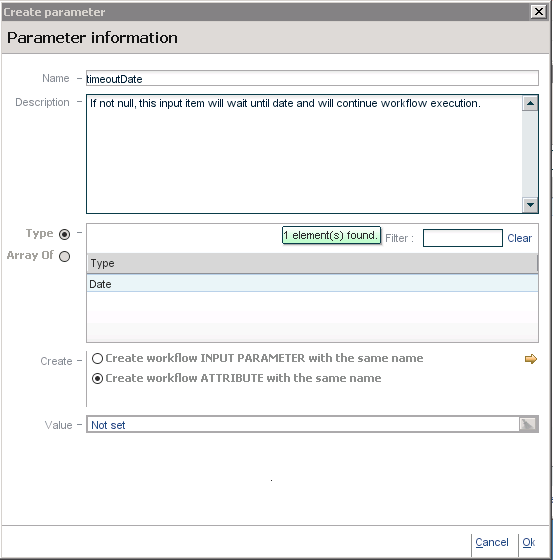
Back on the user interaction. Click on the "not set" link of the timeout.date.
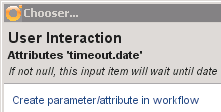
Create an attribute and call it timeoutDate. Do not set a value. We will handle this later on. Click on the Ok link.
Click on the "External inputs".
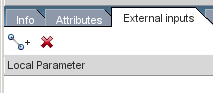
Click on the left link icon to create an External Input.
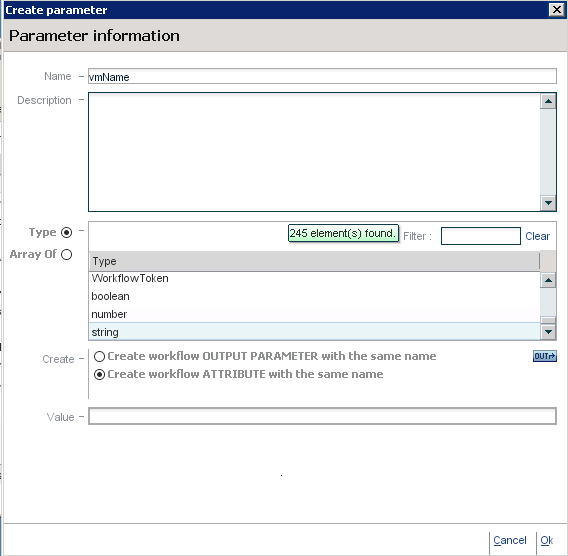
Call it "vmName" of type String (default). Click the Ok link.
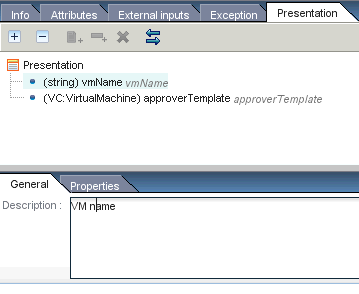
Create another attribute and call it "approverTemplate" of type VC:virtualMachine.
We have created the attributes that will be presented in the user interaction.
To have more descriptive labels than the attribute names you can click on each of these and change the description in the General tab.
Now we need to work on the data flows.
Click on the provision VM workflow. We need to define which inputs will be used for provisioning the VM.
Link the vm from the Provision VM IN pane of the middle left box to the approverTemplate in the bottom left box.
Link the name from the Provision VM IN to the vmName attribute in the bottom left box.
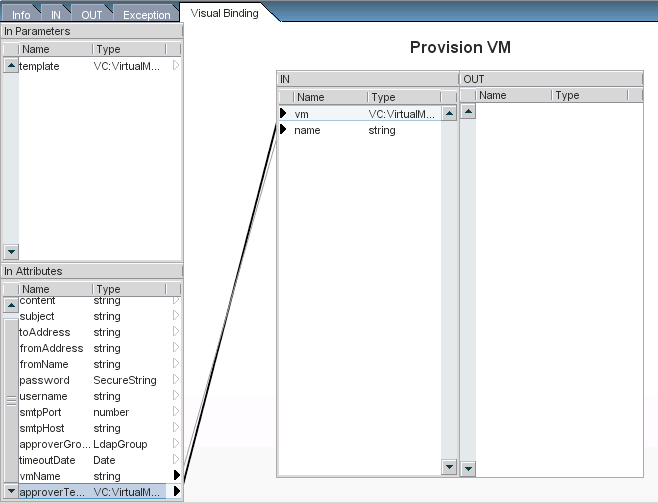
We just defined that Provision VM will use the attributes part of the approver user interaction.
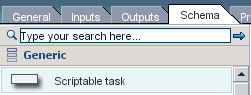
The user interaction is using attributes. It cannot use the Request VM input parameters since input parameters are read-only. We need to set the user interaction attributes with the requester input parameters. To do this in the Schema Tab / Generic tab Click on "Scriptable task" and drag and drop it on the schema. You can double Click on the scriptable box to rename it to something more descriptive like "Set approver template"
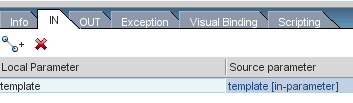
Click on the "IN" tab (bottom pane), click on the link icon (with plus sign) to add a local parameter. Double Click on "template".
Click on the "OUT" tab (bottom pane), click on the link icon (with plus sign) to add a local parameter. Double Click on "approverTemplate".
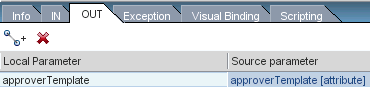
The template will be the input used by the requester, the approverTemplate will be a copy of the template input the approver will be able to change in the user interaction. We have defined the local parameters linked to the outside of the scripting box, now we need to define what happens in the box.
Click on the Scripting tab. Click in the text area, click on the approverTemplate link press "space", "=", "space" ,click on the template link. You have just set the approverTemplate attribute with the template input parameter.

Now we need to build the work flow. Link the different boxes in the following order (use the link icon or ctrl click between the boxes). Drag and drop an "End workflow" element from the Generic tab.
Validate the workflow.

If you completed all the previous steps successfully the workflow should be valid.
Development of the "Request VM" workflow - Presentation
Since this workflow will be targeted at end user we are now going to improve the presentation.
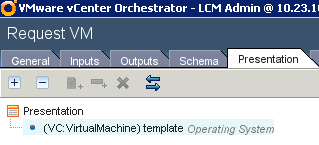
Go in the presentation tab. You will see that the template input you have created previously is there. By default the label of the input is the description you defined for the input description. If we would not have provided a description it would have been defaulted to the input name "template" and would require being renamed for having a better label.
Click on the "Presentation" root element.
Click on to add a new Step. Name it "Request VM" and press Enter.
Click on  to add a new section. Name it "VM details" and press Enter.
Now drag and drop your template input under the VM details section.
Click on the properties tab. Click on to add a property, double click on "Select value as". The default value for this property is "list". This will make the template input selection appear as a searchable field instead of the default tree view.
The step and the section also have a general tab to include their respective descriptions / instructions in the presentation. You can add text in these so you can for example provide specific instructions to the user.
We are now done with the presentation. Save and close the workflow.
Development of the "Request VM" workflow - Test from the vCO client
We can now test the workflow. Right Click Execute Workflow.
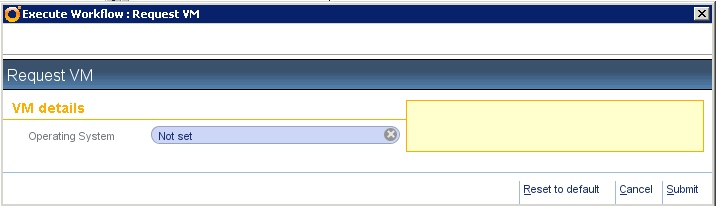
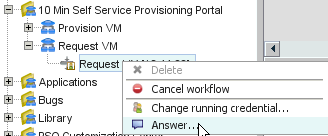
Select a VM or template and submit. The workflow will progress trough the different boxes and stop in a Waiting state on the User Interaction.

Right click on the workflow execution and select answer.
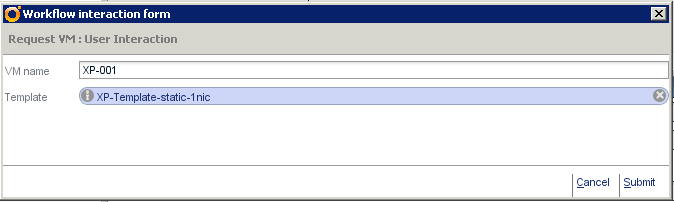
Fill in the VM name. Change the requested template if required. Submit. This will be your approval as approver.
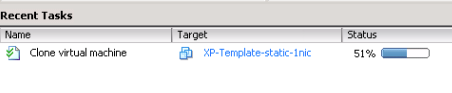
You can check that the VM is cloning successfully in vCenter.
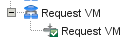
And that your workflow completed successfully.
The Request / Approval / Provisioning basic functionality is working. We can now polish this with improving user experience and preventing errors.
Provide a specific template list for the requester to choose from
Click on the general tab and create the following attribute. Set a value for the templateRoot attribute (this is going to be the VM folder from which the user will be able to select VM templates).

Now we need to tell the presentation to use this root for the presentation. Click on the Presentation tab / Properties. Change the "Select value as" to "tree". Add a new "Specify a root object" property. Click on the pencil icon on the right to set it to your templateRoot.

Provide the requester user name to the approver and make some of the inputs mandatory to prevent errors
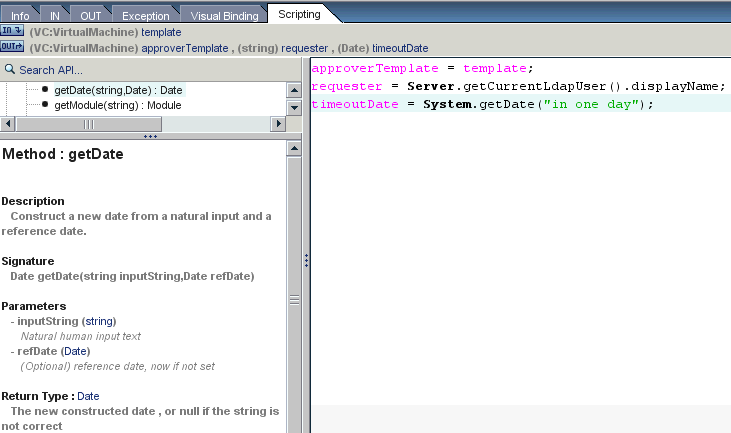
Get back to The schema tab and click on the scriptable box. Click on the "OUT" tab (bottom pane). Create an attribute called requester (no need to set a value).

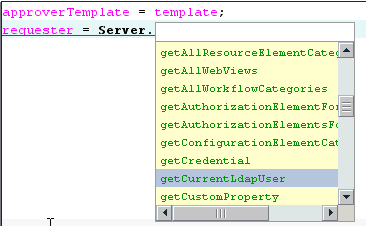
Click on the Script tab. Click in it after the existing text. Click on the "requester" link above the scriptable box to insert the requester string. Type " = Server."
The vCO server hold the current workflow user. The Server object will allow us to call the appropriate method to retrieve the current user. After the point press Ctrl Space. This will list the list of properties and methods available for the server object. Select getCurrentLdapUser. Ctrl space is a convenient way to get properties or methods for an object that has been declared as an input or output of a scriptable box.
On the left side of the screen there is an API search. Unfold the Server Object and click on the getCurrentLdapUser(). This will display the following information.
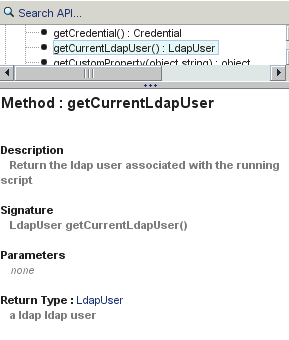
This method returns an LdapUser Object. Click on the LdapUser link to get to its properties.
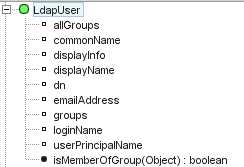
We will be interested by the displayName property. We will complete the scriptable box as follows:

We now have the code to store the requester name in an attribute, we need to make it available to the requester.
In the schema click on the User interaction / Presentation tab (bottom pane), for each of the inputs use the properties tab to add a new property "Mandatory input". This will avoid to submit without filling one of the inputs.
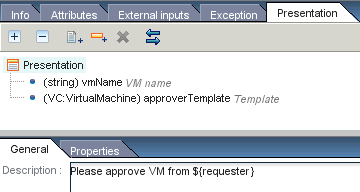
Click on the Presentation root element of the presentation. Click on General and write "Please approve VM from ${requester}". The ${attribute} syntax allows to insert the value of the attribute parameter in the presentation.
Handle exception remediation on user interaction timeout
Click on the Exception tab. Click on the "not set" link. Create an attribute (use the default errorCode name).

This errorCode will be set with an exception error string if the user interaction fails. Previously we set the user interaction with a timeout attribute. We are now going to set it with the time we want the user interaction to stop and throw an exception.
Go back to the scriptable box, click on the OUT tab and add the timeoutDate attribute. Click at the end of the script box and add " = System.getDate("in one day");". This time we used the System object to get a date. You can browse the API search to check how the getDate method works.
Now that we have a time set for the timeout the user interaction will throw an exception one day after the request is done if nobody approve the request. We will need to catch the error and define a remediation flow. Drag and drop a new scriptable box on the schema. Call it "Timeout". In the scriptable box add errorCode as input parameter. Write the script "Server.log("Request VM", "User Interaction reached timeout: " + errorCode);". This will write an entry in the vCO database event log.
Link the User Interaction to this box. The red doted line represents the exception handler. Link the timeout back to the send interaction. Our simple remediation is to send back the request until the approver answer !
In the "Request VM" Presentation, select the template input. In the properties tab add a new property "Mandatory input". This will avoid request to be made without providing a template.
Validate the workflow. If you did everything right you should have the following:
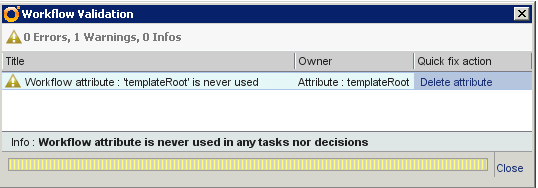
There is a warning because the validation mechanism does not detect attributes used in the presentation. Do not delete the attribute, close the window.
Development of the "Request VM" workflow - Setting up workflow rights
You want the users from the requester group to be able to run the request workflow but certainly do not want your requesters to run all the workflows on the vCO server !
Assumption: As an approver you are already in an LDAP group having part of the vCO Admin group defined in the configuration. We will focus on setting permissions so a requester can log in the web operator and only run the Request VM workflow.
In the workflows tab select the root item

Right Click, and click
Click on 
Check view. All the sub element will inherit with the same rights
In my case the requester group is called BuildTeam
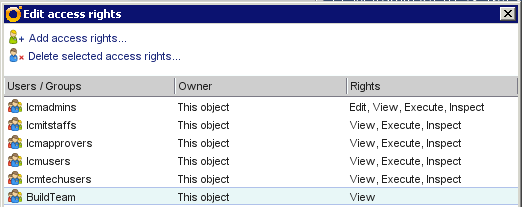
Save the changes. It is necessary to have view rights to be able to reach the Request VM workflow.
Now edit access rights on the Request VM workflow. Add Rights, Check View, Inspect, Execute.
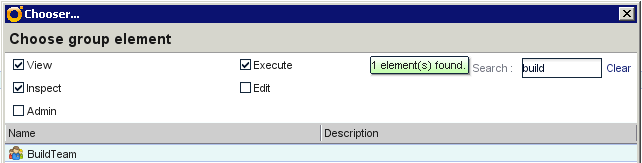
Save the changes.
BuildTeam is now listed for both the inherited rights and the one I have specifically set on this workflow.
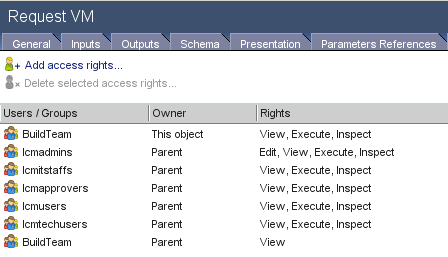
Save the changes.
Development of the "Request VM" workflow - Test from the weboperator webview
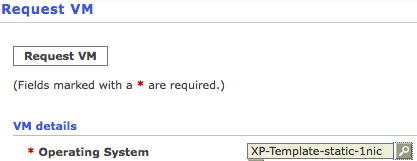
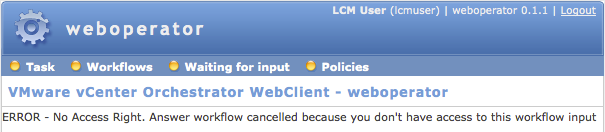
Log in the web operator webview (http://hostname:8280/vmo/weboperator/default.html) as a requester (the requester must be a member of the group you have just set rights to Execute the workflow).
Try to execute "Provision VM". If you are not member of another group granting you rights on vCO workflows you should see the following:

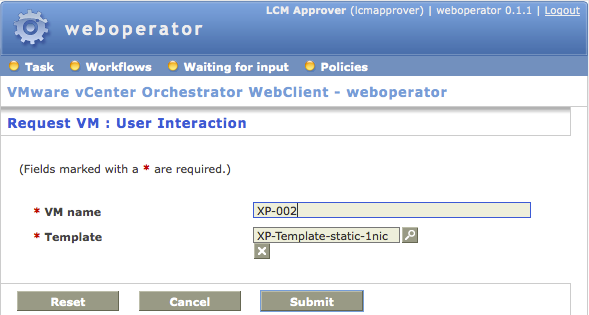
Execute the "Request VM" workflow. Select a template. Submit the workflow.
UPDATE NOTE: You will see in your environment that if you follow exactly the steps in this article that you still get an error when attempting to request a VM. This is doe to other components of the workflow you are calling not having permission granted to your user. See Part 3 of this series for additional detail and required steps.
In the approver email box a new email is received. Click on the answer link.
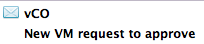
With the following Content

If you were still log in as the requester you will get the following
If so log off and log back in as the approver. Set a VM name and submit.
Once the workflow will have completed you will see the following after refreshing the page.
Congratulations you have completed a simple self service provisioning portal !
Other articles in Series:
Part 1
Part 3
