Create a Simple vCO Self Service VM Provisioning Portal - Part 3
In part two of this series, you learned how to use a user interaction workflow element to allow for an approver to approve a server request. You also learned that a number of permissions are required throughout vCO in order for the approval to actually perform the server request. It is likely that you would have to modify permissions on several other workflows and actions throughout vCO in order for tutorial 2 to fully work for a non-admin account. In this tutorial, we'll focus on creating a custom Webview that will limit the number of actions a user may perform by presenting to them only what they need. Topics of this article will include:
- Setting permissions in vCO
- Creating a custom webview from the default webview template
- Exporting and Importing webview elements
- Developer Mode
- Customizing the webview
- Launching workflows from a webview
- Customize the Send Notification workflow
Setting Permissions
In most circumstances, you will not want to allow users to access your vCO server using the vCO client. Instead, they should be accessing the server via their web browser. You can prevent users from accessing the vCO server with the client by using firewall rules (simplest way to restrict.) Allow only the ports necessary for your users to access via http and https. We need to go ahead and grant your requesters group View and Execute permissions to everything in vCO so that all actions and workflows called by any of your custom workflows can be executed.
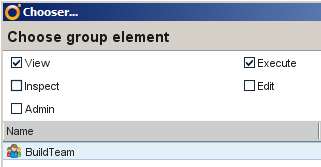
In the workflows tab select the root item

Right Click, and click
Click on 
Check View and Execute. All the sub elements will inherit with the same rights.
Create a Custom Webview from Template
Rather than starting a webview from scratch, we'll use the default template that comes with vCO to get things rolling.
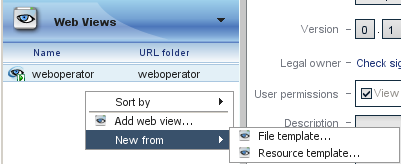
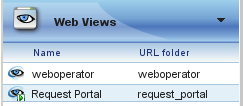
- Click "Webviews"
- Right-click in the white-space below Weboperator, then click "New from" and then select "File template..."
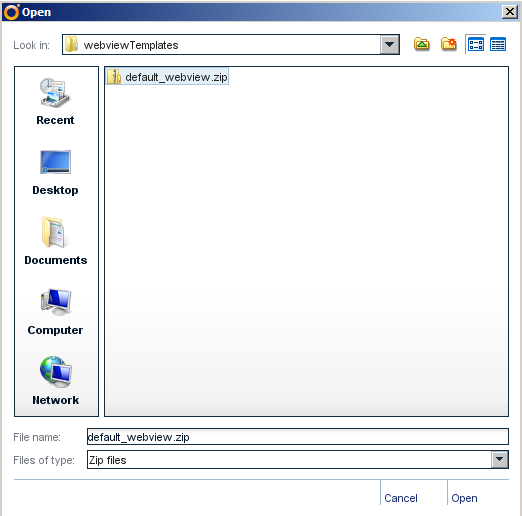
- You'll need to browse to one of the following locations:
- c:\program files\vmware\orchestrator\apps\webviewTemplates\ <- this location if a standalone vCO installation
- c:\program files\vmware\infrastructure\orchestrator\apps\webviewTemplates\ <- this location if a vCenter installed vCO
- Once you have browsed to the webviewTemplates folder, select the default_webview.zip file and click "Open"
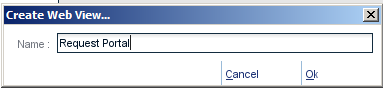
- When prompted, change the default text "default_webview_FromTemplate" to something more appropriate like "Request Portal" and click "Ok"
- You now have a "Request Portal" webview listed!
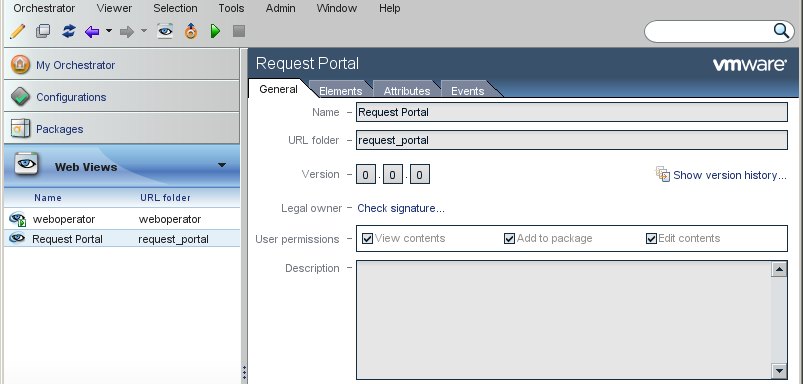
- Click the Green Play button to Publish the webview, or right-click and select "Publish" so we can see what the default webview looks like.
- While we're here, let's unpublish the weboperator since we won't be using that anymore. Select "weboperator", then click the Red stop button to Unpublish, or right-click and select "Unpublish"
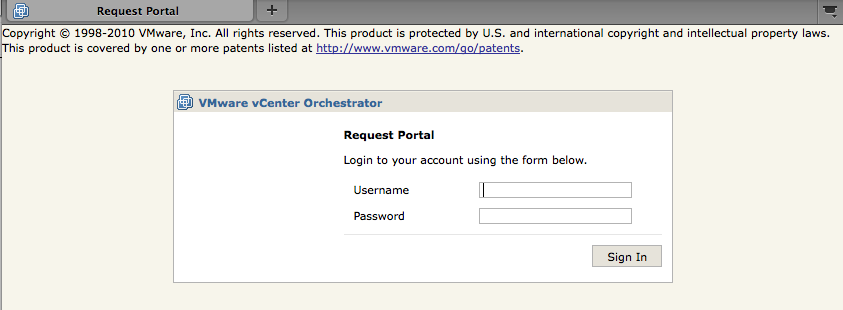
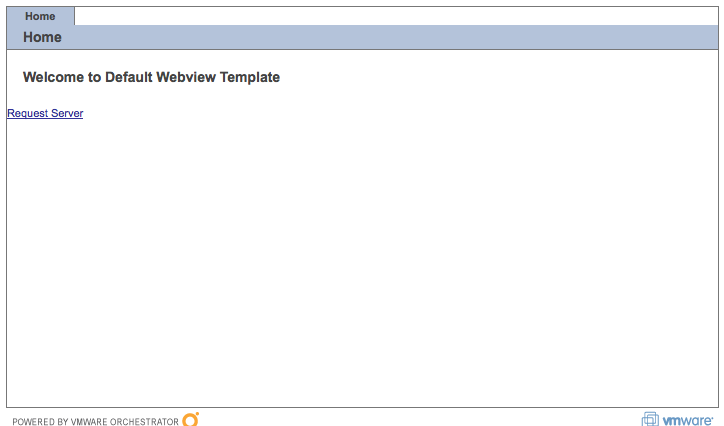
- Now open your browser to http://your-lcm-server:8280/vmo/request_portal and login
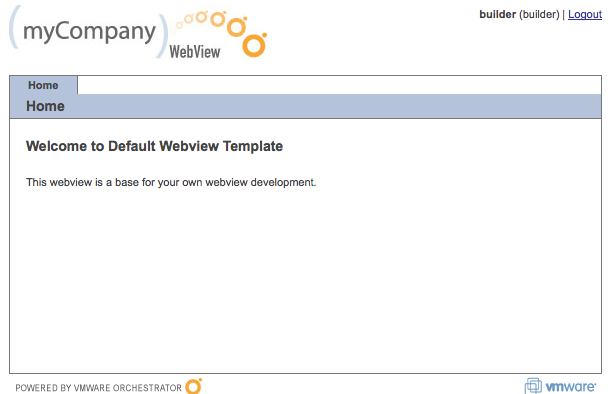
- As you can see, once you are logged in the default layout appears quite simple: Logo in top-left of window, logged in user name and Logout link in top-right of window powered-by details at the bottom of the page, a "Home" menu tab across the top of a content area:
In the next section, we'll export the files that make up this webview and begin
Working with Webview Files
Webviews consist of many different html files, css, images, etc that are all packed into the "Webview" we see in the vCO client or browse to. There are two options for doing webview development:
- Non-Development Mode:
- Export Files
- Modify the files
- Unpublish the webview
- Right-click the webview and click "Edit"
- Import Files
- Publish the webview
- Check webview in browser
- REPEAT steps 2-6 as you make changes
- Development Mode:
- Configure vCO to run in Development Mode and restart service
- Export Files to development mode specified folder
- Modify the files
- Check webview in browser
- REPEAT steps 3-4 as needed until development is complete
- Unpublish the webview
- Right-click the webview and click "Edit"
- Import Files
- Publish the webview
As you can see, the Development mode allows immediate view of your changes and you only have to unpublish/publish once. Be warned though: Development Mode is NOT suitable for a production server. Extended use of Development mode may result in undesired results. If strange behavior is encountered, try restarting the vCenter Orchestrator Server service to clear memory.
We'll opt for Development mode since we do have a number of changes that we will be implementing and we will need to check our work on a regular basis throughout development.
Setting up Development Mode
Setting up Development mode is a three step process: Create a folder on the vCO server that can host the webview development folder. Enable Development mode, specifying the folder that was setup. Export webview to the development folder.
Webview Development Folder
The webview development folder will be where you work on the webview as you begin customizing it. vCO will use this folder as the source for displaying files to a browser while in Development mode so it must be a local folder to the vCO server. When specifying the folder, you must have a general webview root folder, then a subfolder for each webview that must be displayed. In this case, the subfolder name needs to be "request_portal".
For your root folder, create something like: c:\webviews
Next, create your subfolder "request_portal" so that your structure is c:\webviews\request_portal
Enable Development Mode
Enabling development mode is done through the vCenter Orchestrator Configuration so start off by loggin in to that at http://yourVCOserver:8282.
- Click on the "Advanced Configuration" tab in the right pane
- Tick the checkbox "Enable web view development mode"
- Specify the "Web view directory" as "C:\webviews" (or whatever you chose in the previous section)
- Click the "Apply Changes" button
- Next, click "Startup Options" in the left pane
- Now click "Restart Service" in the right pane
We are now ready to export our webview to the development folder. To confirm that you are now in development mode, attempt to browse to your Request Portal URL: http://yourVCOserver:8280/vmo/request_portal . You should receive the following message:
No default page defined
The webview 'Request Portal' has no default page defined. A default page is a page located at the root of the webview and named default.html or index.html.
Export Webview to Development Folder
After your vCenter Orchestrator Server service has completed the restart, launch your vCenter Orchestrator Client and login with admin rights. (Detailed information on valid code syntax may be found in the vCenter Orchestrator Developers guide - Visit the official VMware vCO Documentation page)
- Click on "Web Views" in the left pane
- Select the "Request Portal" Web View
- In the right pane, click on the "Elements" tab
- Now, click the "Export to directory" link
- Browse to the "c:\webviews\request_portal" folder that you created earlier and click the "Export" link in the bottom right corner of the window. (Remember that the specific webview "request_portal" folder must be a subdirectory of the folder specified as the Web view directory in the advanced configuration)
- Now confirm that you can once again browse to the Request Portal at http://yourVCOserver:8280/vmo/request_portal . You should see:
- Go ahead and login to the webview as a user (member of your requester group)
Adding a link to launch a workflow
- The first file we'll look at here is the c:\webviews\request_portal\default.html
1
2
3
4
<vco jwcid="@layout/MyBorder" section="literal: home" title="Home"> <h2 style="margin-left: 16px; margin-top: 0px; padding-top:18px;">Welcome to Default Webview Template</h2> <p style="margin-left: 16px;">This webview is a base for your own webview development.</p> </vco> - The first line in the code loads a layout file called "MyBorder". This file sets up the general layout and appearance of the page we are looking at. The remaining content here is what we actually see in our browser inside the box. Let's get started by creating a "Request Server" link that will launch our workflow! We'll be useing the "vco:WorkflowLink" component (see page 295 of the Developer's guide.)
- Replace the content of the default.html file with the following:
The new line will launch the workflow that is mapped to the "RequestVM" attribute of your webview (we'll do that next). As you can see, we reference a couple html files that do not yet exist so we'll also need to create those so that the workflow execution and submission result pages will have a consistent look and feel to your portal. We are setting "isSync" to false because we want the workflow to just go ahead and execute in the background - especially since we have a user-interaction that the requester may not have access to respond to. The "isDialog" is set to a value of "false" so that the dialog doesn't attempt to present the requester with the user interaction for approval. By setting to false, we process the user interaction within the "form.html" file that we will be making. After the workflow has been submitted, we will present the requester with the "submitted.html" file, and if the requester cancels, the'll be sent back to the default.html.1 2 3 4 5 6<vco jwcid="@layout/MyBorder" section="literal: home" title="Home"> <h2 style="margin-left: 16px; margin-top: 0px; padding-top:18px;">Welcome to the Server Request Portal</h2> <p style="margin-left: 16px"> <span jwcid="@vco:WorkflowLink" workflow="RequestVM" isDialog="false" isSync="false" webformPage="/vmo/request_portal/form.html" returnUrl="/vmo/request_portal/submitted.html" cancelUrl="/vmo/request_portal/default.html">Request Server</span> </p> </vco>
Mapping a workflow to a Webview attribute
- Now we must actually define the "RequestVM" attribute on the Web View so that it knows which workflow to actually execute when the link is clicked.
- In your vCO client, select your "Request Portal" webview, and then enter Edit mode by
- Unpublish the webview
- Edit the webview
- Click the "Attributes" tab
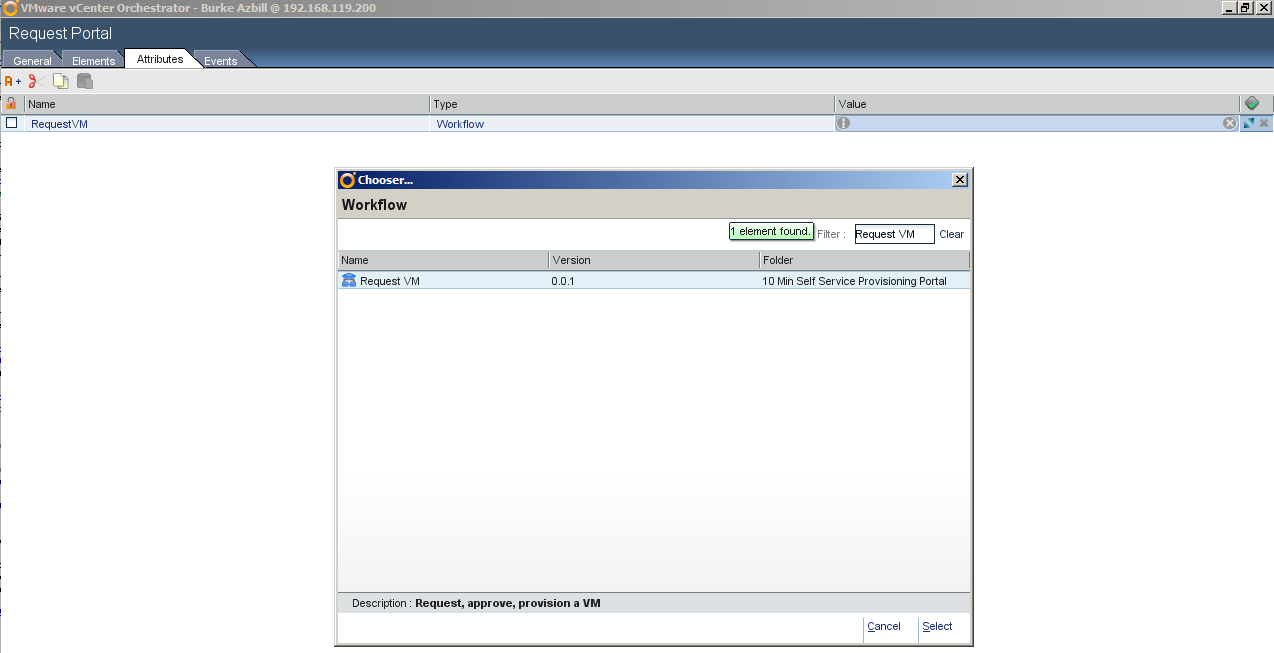
- Add a new Attribute of type "Workflow" and name it "RequestVM" - NOTE that this attribute name is case sensitive.
- Click the empty space in the Value column, then find and select your "Request VM" workflow
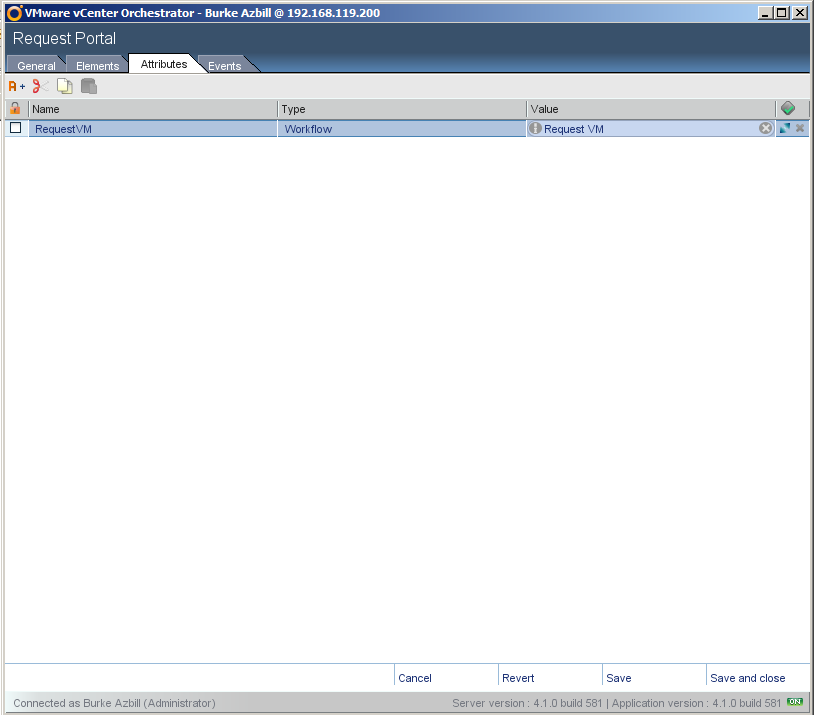
- Click "Save and Close" when done, then publish the webview.
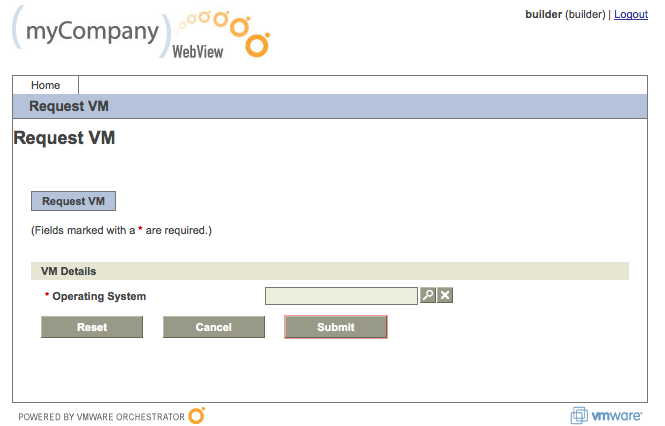
- Browse to your Request Portal and confirm you have the link present:
Now, before we can proceed with clicking the link, we need to add the missing submitted.html and form.html files to the webview.
Adding Files to a Webview
In the earlier step where we added a link to the default.html page, we referenced two pages that had yet to be created: submitted.html and form.html. We'll create those here.
- submitted.html
As you can see above, the content of the submitted.html file is quite simple. We start off by loading our border file, then we provide a little bit of content - a message to the requester that the request has been accepted.
1 2 3<vco jwcid="@layout/MyBorder" section="literal: home" title="Request Accepted"> <h2>Virtual Machine Request Accepted!</h2> </vco> - form.html
In the form.html file, we start off by loading our border file and then we use a special component called vco:WebformContainer to execute the workflow in.
1 2 3<vco jwcid="@layout/MyBorder" section="literal: home" title="Request VM"> <vco jwcid="@vco:WebformContainer"> </vco> - Once you have saved both of these files to your folder, go ahead and browse to the Request Portal and click the link to Request Server:
Customize the Send Interaction workflow
If you have attempted to run the request process up to this point, you have probably noticed that the URL that is generated for the interaction notification email message points to the "weboperator" webview. Since we have gone through the effort of creating a custom webview, and are likely NOT to keep the weboperator published, we need to fix this behavoir. This section of the tutorial will walk you through the changes necessary to accomplish this task.
- Create a new Workflow Category under the "10 Min Self Service Provisioning Portal" Workflow Category
- Duplicate the "Send interaction" workflow, placing your duplicate copy in the "Helpers" workflow category you just created
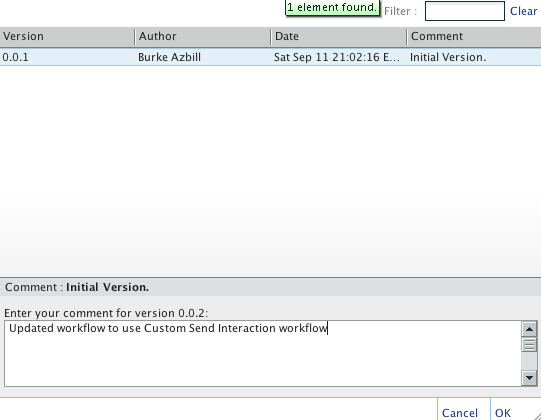
- Next, Edit your "Custom Send Interaction" workflow, setting your initial version number and then go to the "Scripting" tab of the Scriptable Task element in the workflow:
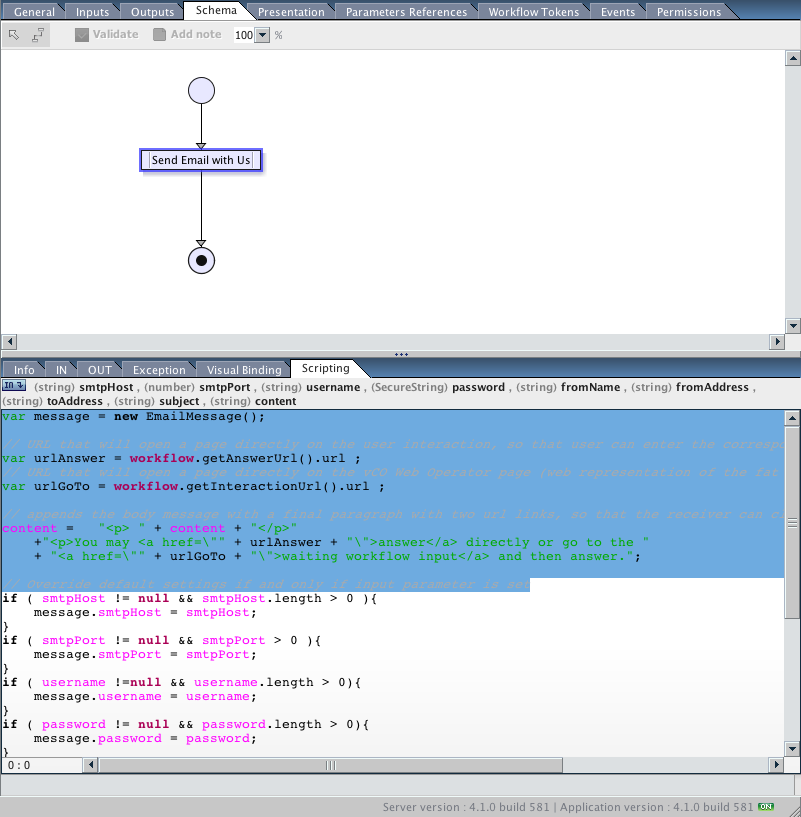
- As shown above, highlight the first several lines of content and delete them. The last line deleted should be the "// Override default settings if and only if input parameter is set" line (or you may leave this line, but delete everything above it.
- Now, paste in the following code at the top:
1 2 3 4 5 6 7var message = new EmailMessage(); var urlAnswer = workflow.getAnswerUrl().url ; if (webviewName != null && webviewName.length > 0){ urlAnswer = urlAnswer.replace(new RegExp("weboperator", "g"),webviewName); } if (formFile != null && formFile.length >0){ urlAnswer = urlAnswer.replace(new RegExp("webform.html", "g"),formFile); } content = "<p>You may respond to the request via the web interface by clicking the link below: <a href='"+urlAnswer+"'>CLICK HERE TO RESPOND VIA WEB</a>.</p><p>"+content+"</p>"; - Next, add two new inputs to the scriptable task:
- Click on the In tab of the bottom pane

- Click the Add Input link

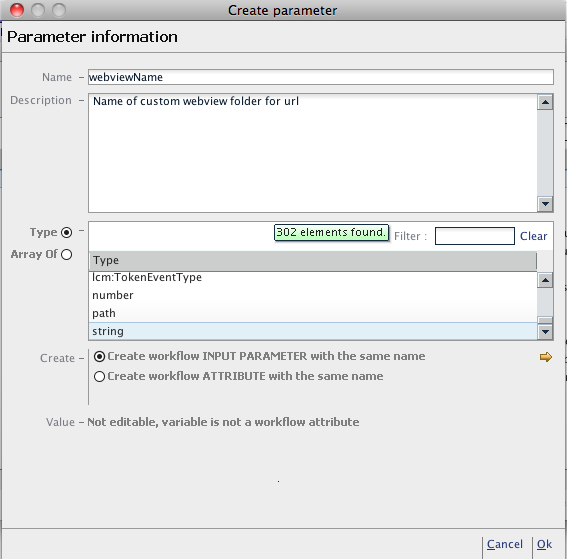
- Now click the "Create parameter/attribute in workflow, add a new INPUT PARAMETER for "webviewName" of type "string"
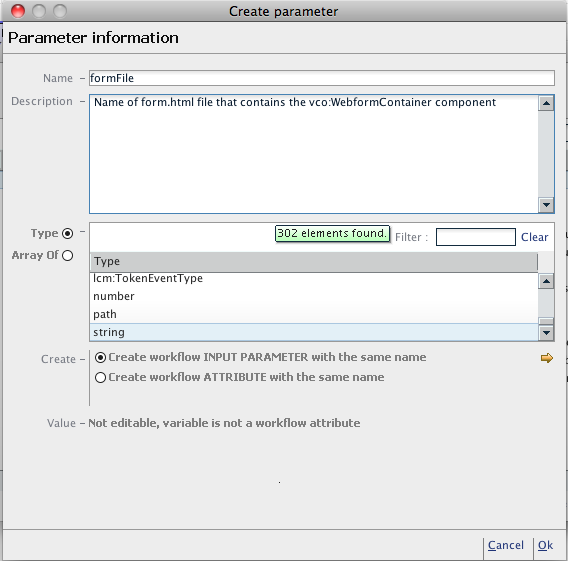
- And repeat these steps to add a new INPUT PARAMETER for "formFile" of type "string"
- Now, click Save and Close in the bottom right-corner
- Your Custom Send Interaction workflow is now ready for use so we need to update the Request VM workflow to use this one instead of the core vCO "Send Interaction" workflow.
- Edit your "Request VM" workflow and go to the Schema tab
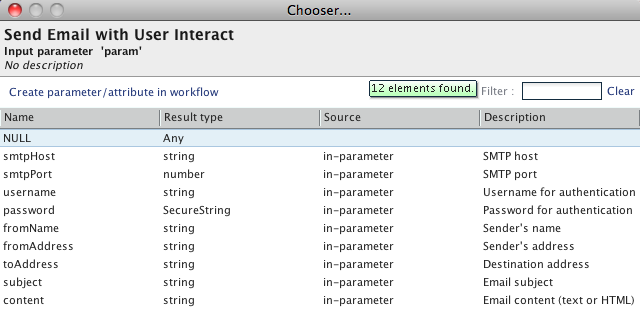
- Now click on the "Send Interaction" workflow element and choose the "Info" tab in the bottom pane
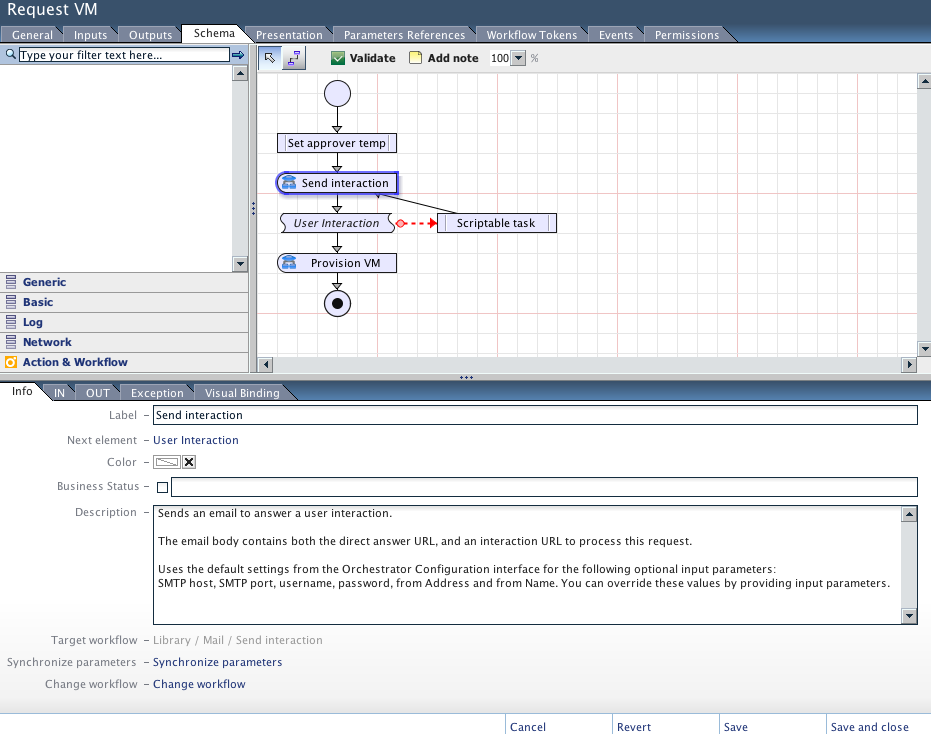
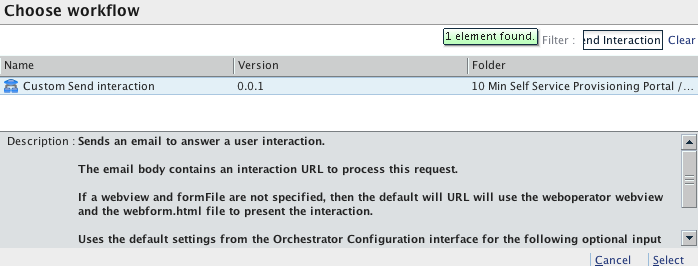
- Now click the "Change workflow" link in the bottom of the info tab and choose your "Helpers\Custom Send Interaction" workflow:
- And then acknowledge the confirmation prompts
- Click on the "IN" tab and notice that the two new inputs are not yet mapped:
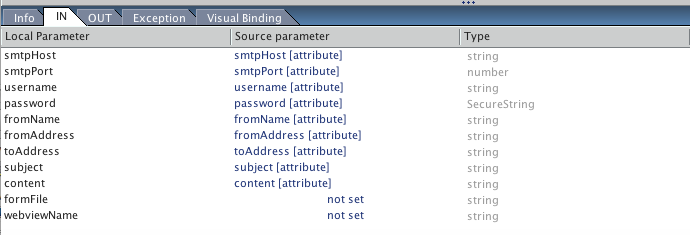
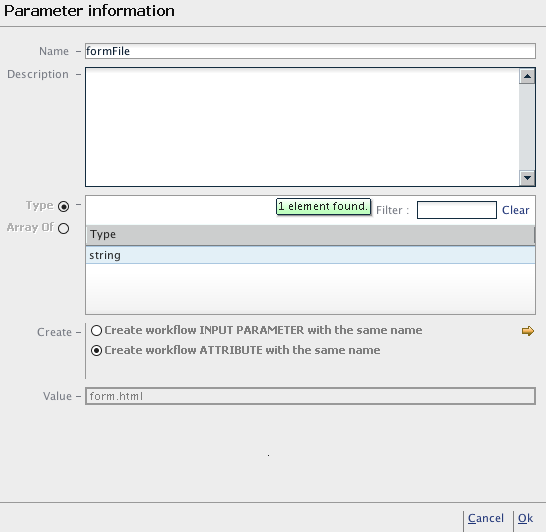
- Click on the "not set" link for "formFile" and add an Attribute with a pre-defined value as follows:
- Now click the "not set" link for the "webviewName" and add an Attribute with a pre-defined value as follows:
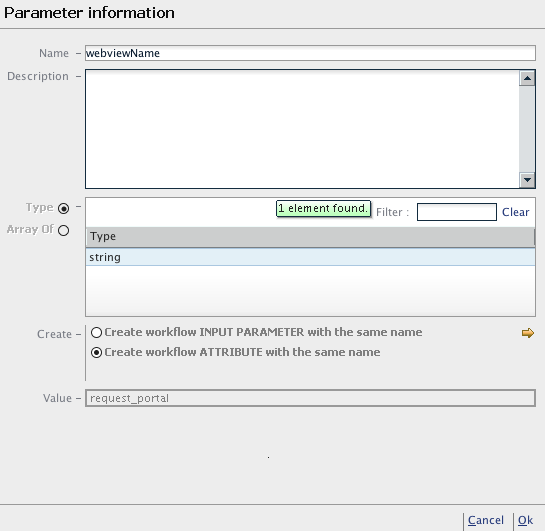
- After adding these two new attributes, click Save, then click the "General" tab of the workflow and increment the version with an appropriate note then click "Save and close":
- Click on the In tab of the bottom pane
You may now login to the "Request Portal" webview as a requester and place a request. As a requester, you should receive a confirmation page stating that your request has been accepted and an e-mail should be sent to your approver with a valid link directly to your "request_portal" . 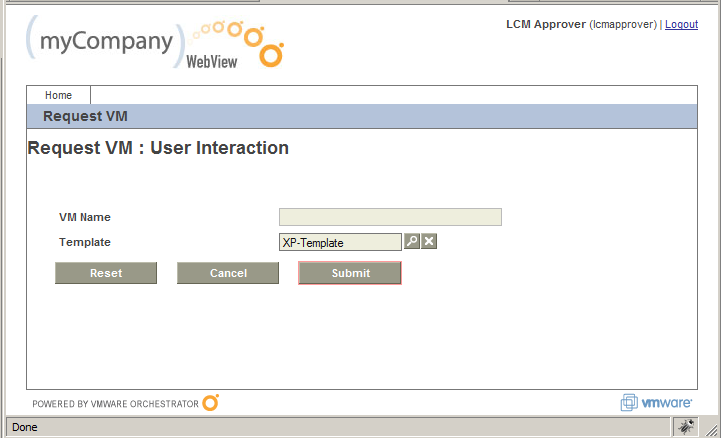 Test the process and confirm that it is working as expected.
Potential topics for future article(s) in this series could include:
- Adding a new tab to the tab-menu of the webview
- Restricting access to tabs of the menu to group members
- Adding a list of Requests waiting for user interaction (approval)
- Enabling e-mail response/approvals for waiting requests
Please submit your comments and feedback on this series here. We read ALL submissions and take them into consideration for future topics. Thank you!

