Dynamic Input Values Based on other Inputs
A frequent requirement when performing orchestration tasks is to have input fields interdependent. For example, if I input XYZ into the first input, I want the second input to be relevant to XYZ. In the past, I have frequently done such workflows where you select a Datacenter for the first input, then the second input would present a list of Datastores (or VMs or Clusters or Hosts). In this tutorial, I’m going to do something a little different. The first input of this demo workflow will be a string and the second will be an AD:User object chosen from a list of objects that were found in Active Directory based on the first input.
Scenario Overview
This article will address the following requirements:
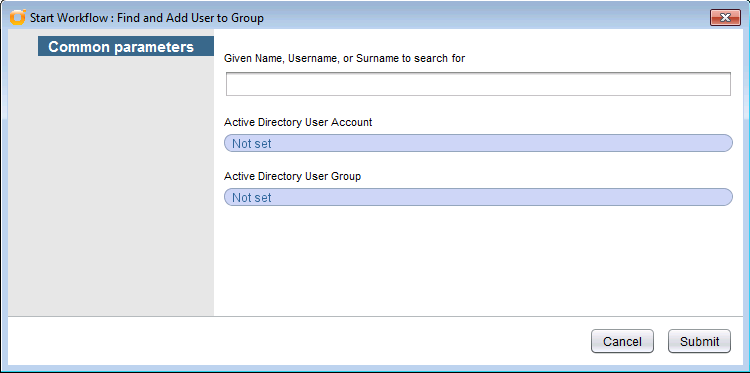
Provide an inteface for admins to login via a web browser to search for and add newly created Active Directory User to one or more groups.
The front-end for this will be vCloud Automation Center (vCAC) 6.1. The Advanced Service Designer (XaaS) will be used to call a custom vCenter Orchestrator (vCO) workflow that actually does the work. Results of the workflow should be visible in vCAC.
This tutorial will touch on the following topics:
- Link input fields so that the values presented on one depend on another
- Present vCO Workflow output via vCAC’s Requests
- Parameter bindings in vCO
- vCO Presentation properties
- vCO Action creation
- vCO Worfklow creation
- Using the vCAC Advanced Service Designer (ASD) to add a vCO Workflow as a Catalog Item
- Publishing a Catalog Item and tying it to a Service
Note: Throughout this article, I use vCO and vCAC as unofficial abbreviations for VMware’s vCenter Orchestrator and vCloud Automation Center respectively. In upcoming versions, these will be vRealize Orchestrator (vRO) and vRealize Automation (vRA).
Environment Requirements
- vCAC should be setup with the default or externa vCO Server configured server (See Administration -> Advanced Services -> Server Configuration)
- A service should be configured and entitled in vCAC to place the custom request in (This article will use a Service named “Demos”)
- An account capable of managing Advanced Services in vCAC and requesting services (this may be the same account or separate accounts: admin acct and user acct)
- The connected vCO Server should have the Active Directory plug-in configured with a SharedSession account in AD with sufficient permissions to add users to groups
- NOTE: () Recent versions of the AD Plug-in will fail to do the user search if you have not defined a default AD server - EVEN IF you have only a single AD server connected! Run the Configure Active Directory plug-in options workflow, and specify a default AD server. This note added Jan 18, 2017
- An account in the vCO Admins group capable of creating new vCO Workflows
Create vCO Workflow Schema
This will be the workflow we call from vCAC’s Advanced Service Designer later, so be sure everything is set as described:
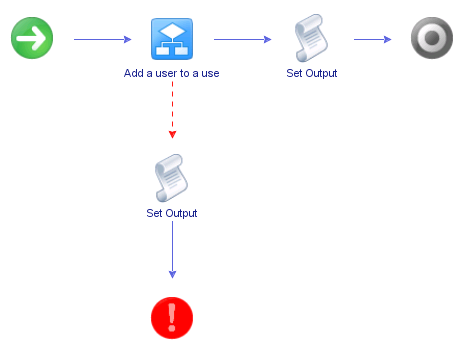
- Create a new workflow called Find and Add User to Group
- Drag the “Add a user to a userGroup” library workflow, an exception element, and two Scriptable tasks onto the schema as shown in the diagram above
- Create 3 Inputs for this workflow: name (String), user (AD:User), and group (AD:UserGroup)
- Create 1 Output for the workflow: outputText (String)
- Confirm (create if it does not exist) that an attribute named “errorCode” was created and is bound to the “Exception” tab of the “Add a user to a user group” workflow
- Rename each of the Scriptable task elements to “Set Output”
Next, review and/or set Input/Attribute/Output bindings.
Bindings: Add a user to a user group
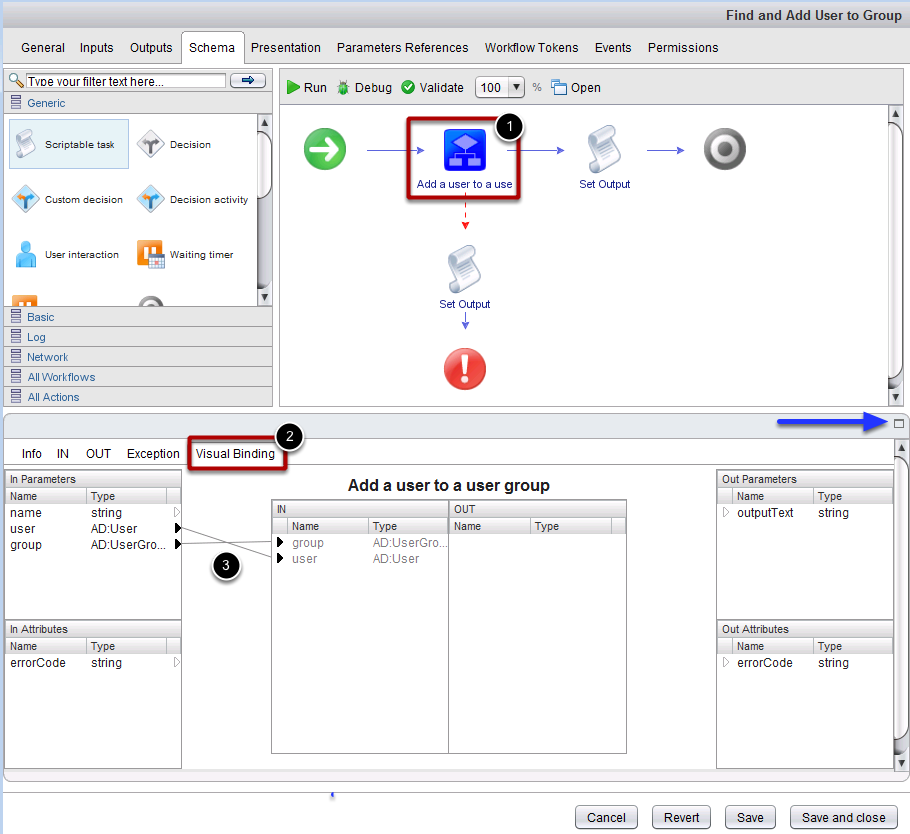
- Select the Add a user to user group workflow
- In the bottom pane (or click the edit icon to bring up the pop-up window for the details), click ont he Visual Binding tab and confirm or set bindings as shown above
- Make sure that group is bound to the In Parameters group and that user is bound to the In Parameters user as shown above
NOTE: If you prefer the behavior shown here where the detail pane is below the selected item rather than clicking the edit icon and having a pop-up window, you can change this on your vCO client:
- If in edit mode, Save and Close
- Click Tools -> User Preferences -> Workflows
- Remove the check from “Edit workflow items in a pop-up window
With this preference set, you can always pop-out the details pane by clicking the small box in the top right corner (highlighted with a BLUE Arrow in the screenshot above.
Bindings: Normal path “Set Output” Scriptable task
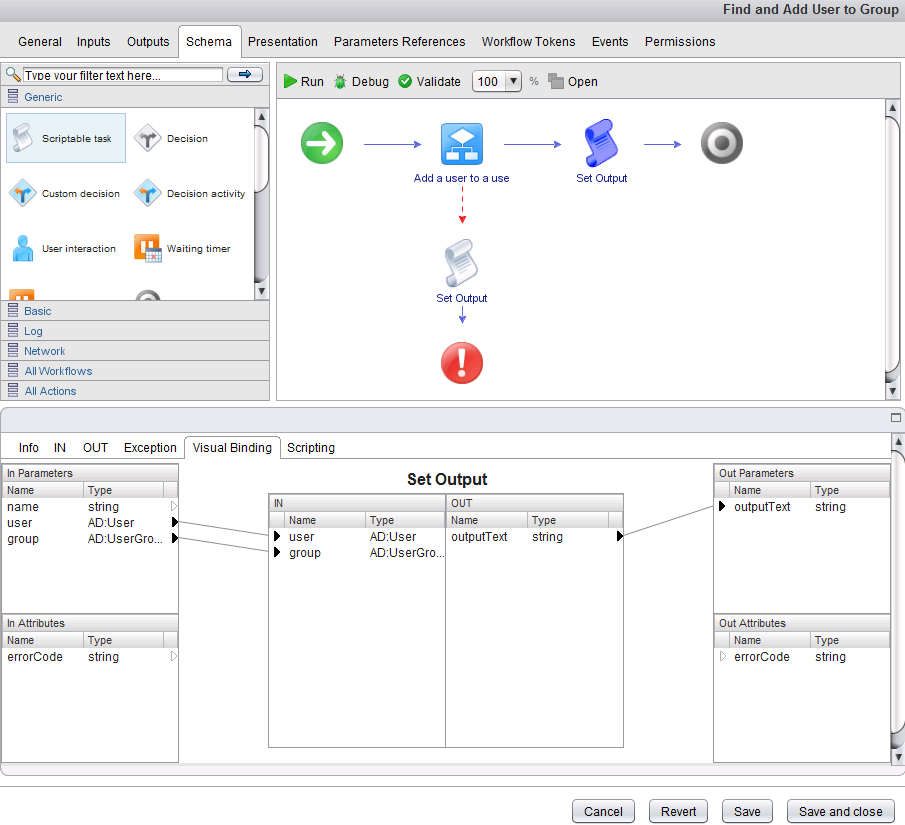
Bind the user and userGroup inputs to the IN and outputText to the OUT for this element as shown in the screenshot above.
Paste the following in to the Scripting tab of the element:
|
|
Bindings: Exception path “Set Output” Scriptable task
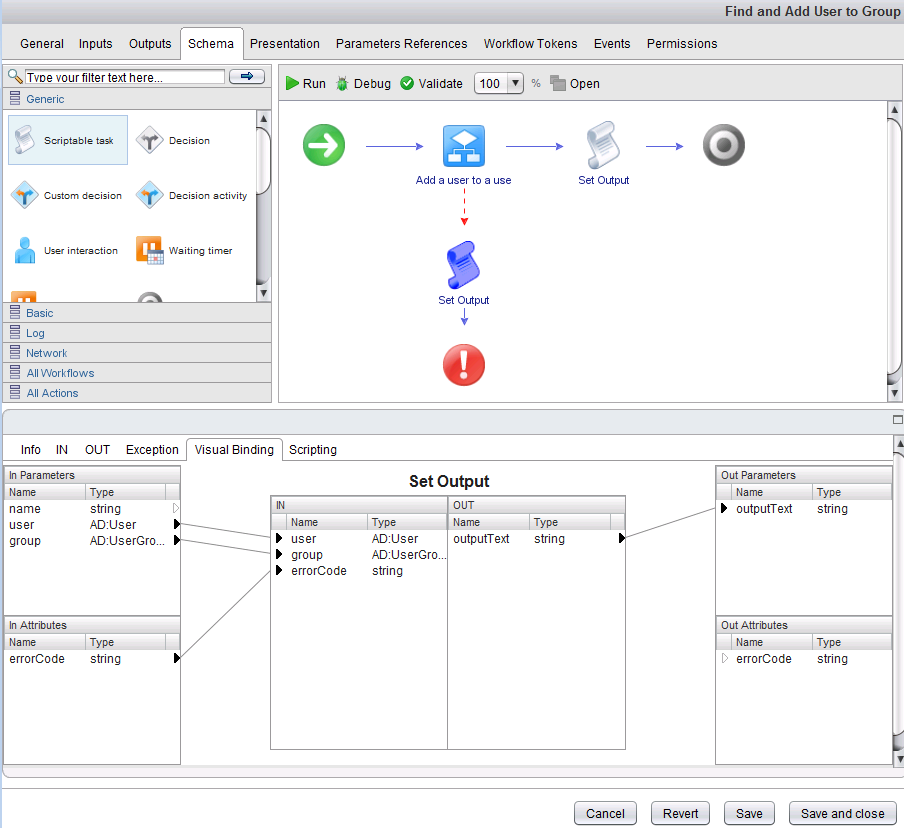
Bind the user and userGroup inputs to the IN and outputText to the OUT for this element. Also, bind the errorCode attribute to the IN tab of this element as shown in the screenshot above.
Paste the following in to the Scripting tab of the element:
|
|
Click Save and Close.
vCO Workflow Current State and next Steps
At this point, the workflow should be capable of prompting for all three inputs individually and processing the request. However, the name input has no effects on the user input at this stage. That can be setup in the Presentation tab of our workflow, but in order to do that, we’ll need an action that:
- Takes a string as an input
- Returns an Array of AD:User objects or an Empty Array if no users are found to match the input string
Let’s create that action now!
Create a findUserByName Action
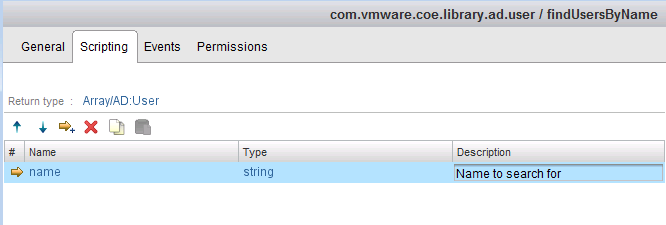
If you don’t already have a module (Action Folder) to place your new action in, create one now. As shown above, I have created one named: com.vmware.coe.library.ad.user <- Note the syntax. vmware.com reversed, followed by my dept. “coe”, then general and specific categories: library.ad
Once you have the action created, set the Return type to Array/AD:User
Add 1 string input and set the name to name
Next, add the following to the scripting box down below:
if (!name) return []; // IMPORTANT: if the "name" input has not been provided, return an empty array. Returning a null will cause presentation issues and excluding the line will generate invalid calls to the AD Plug-in.
|
|
vCO Workflow Presentation
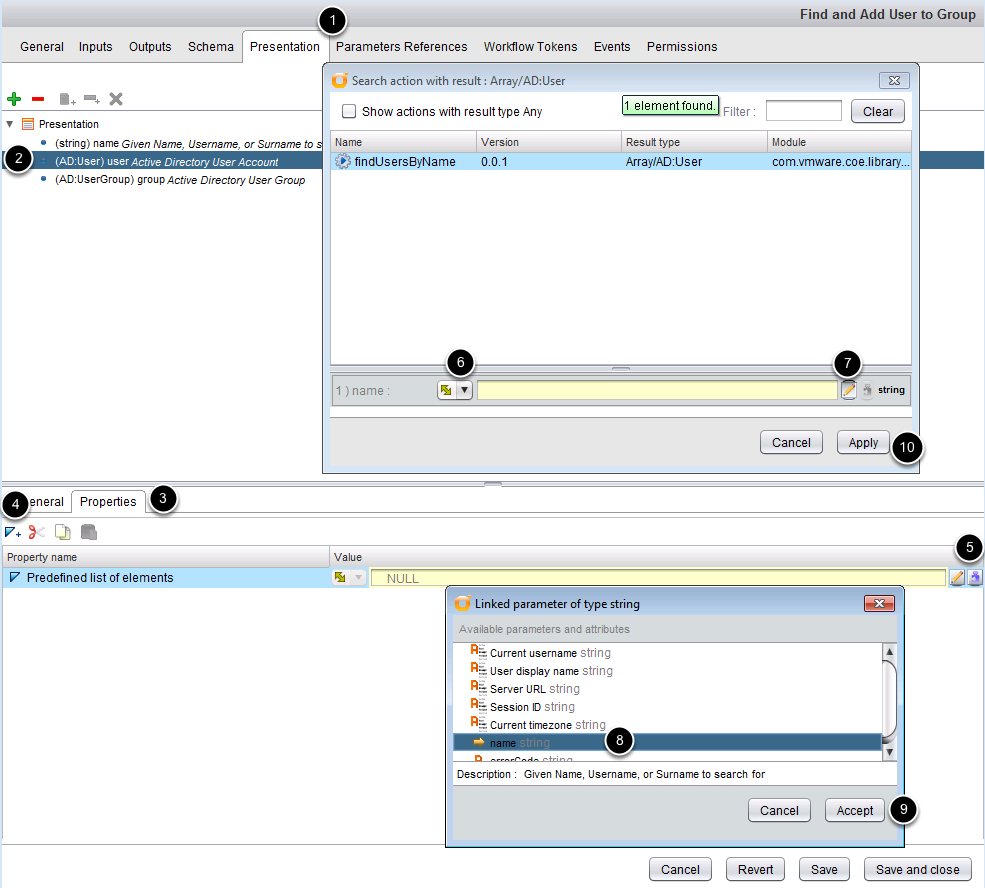
Return to the “Find and add user to group” workflow created earlier and enter edit mode.
- Click on the Presentation tab
- Select the user input
- In the bottom pane, click the Properties tab
- Click the little blue triangle icon to add a new property. When the window pops up, select the Predefined list of elements and click OK
- Click the small puzzle icon to the far right of the window to choose an action that will provide the array of choices. The Search action with result window will pop up and present a list of actions that return an array of objects that are the same type as the input field we have selected. In this case an Array/AD:User. Select the findUsersByName action.
- When an action is selected, each of the inputs to the action are presented in the bottom window. To allow us to specify an existing Input Parameter or Attribute, click the drop-down and select the Double-Arrow icon as shown above.
- Use the Pencil icon to select an Input or Attribute to be used as the action input. This will present the Linked parameter of type string window
- Select the name input
- Click Accept
To wrap up our Presentation settings, add the Mandatory input property to all three inputs and set each to Yes
Save and Test vCO Workflow
At this point, it is important to Save and Close the workflow. Be sure to set your initial Version number and Description for the workflow.
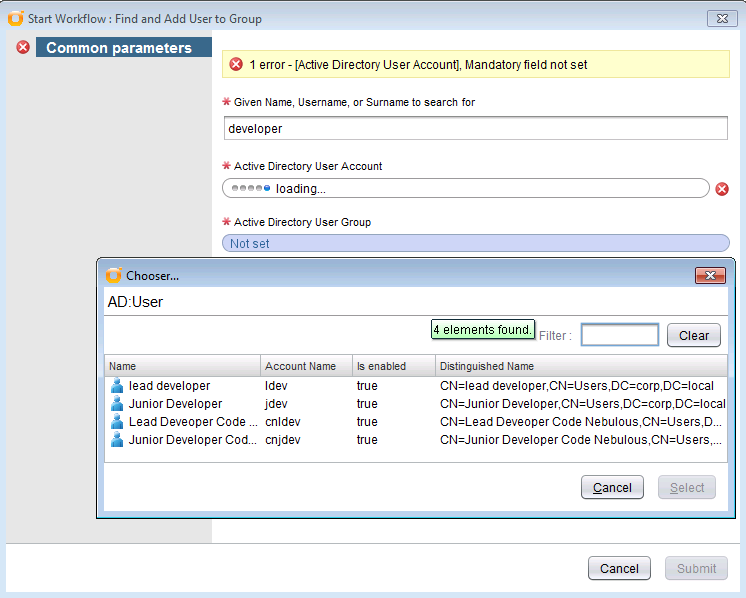
Now, Test the workflow in the vCO Client by running it and specifying the first name or last name of an account you know is in Active Directory.
Once you have a name entered the name (Yes, it will lag a little - this is a small bug with the vCO client and will not be present when the workflow is presented to you in vCAC), Click on the Not set link for the Active Directory User Account input. Confirm that you are presented with one or more accounts that have the “name” you specified as part of their accounts. In my case, I entered “developer” and there are 4 Developer accounts to choose from.
Choose one of the accounts, and click Select.
Choose an Active Directory group to add the user to and click Submit.
Confirm that the user gets added to your AD Group.
Try running the workflow again to add the same user to the same group - what happens?
In both results above, review the value of the outputText Output Parameter to confirm you have expected values.
This workflow should now be ready to incorporate into vCloud Automation Center, let’s do that now!
vCloud Automation Center - Create a new Service Blueprint
Login to vCAC with your administrative account.
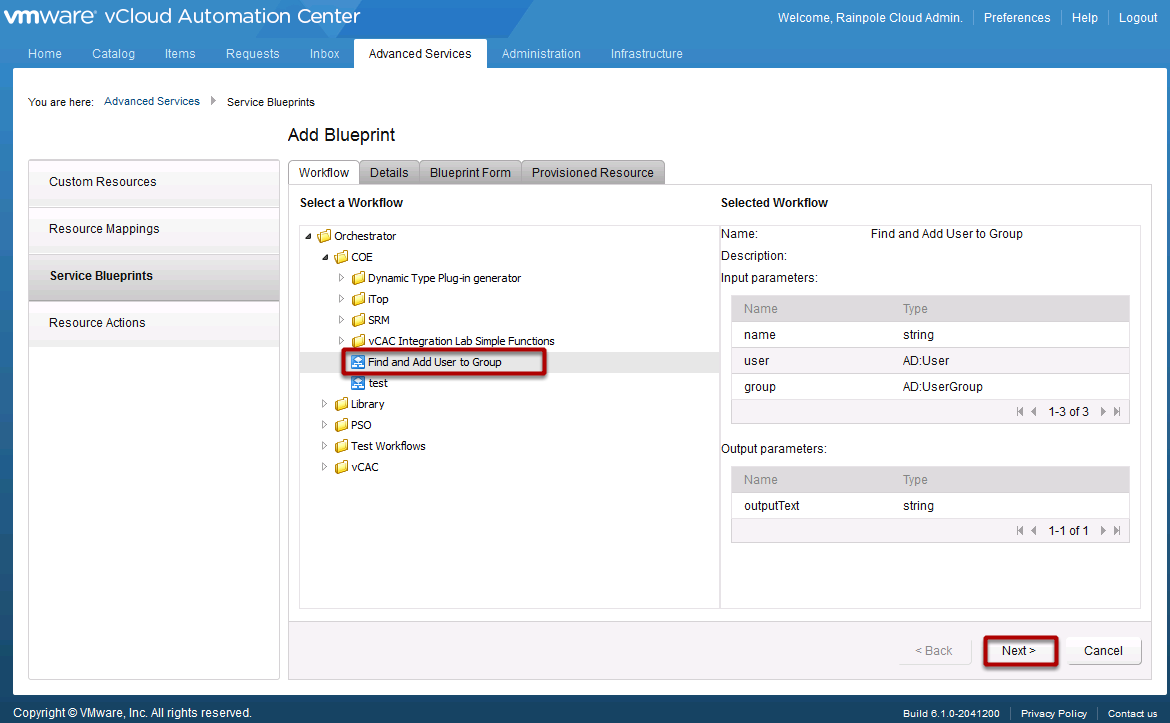
Click the Advanced Services, then select the Service Blueprints entry on the left
Click the Green + Add button to add a new blueprint
Select your Find and Add User to Group workflow that you created in vCenter Orchestrator and click Next
On the next page, place a check in the Hide catalog request information page box and click Next
vCloud Automation Center - Add Form
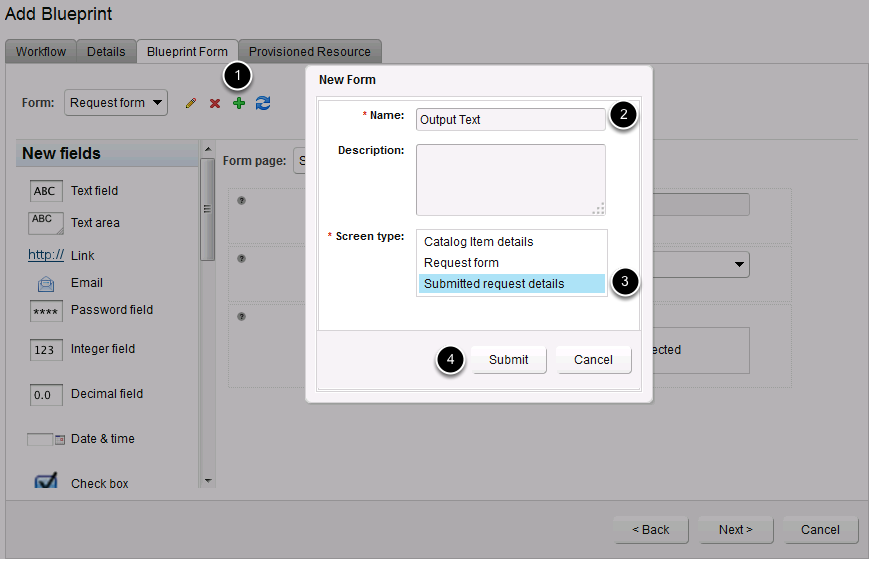
Add a new Form to the Blueprint so that the output text may be available to the user.
- Click the Add Form button (Green +)
- Specify a name such as Output Text
- Select the Submitted request details entry for the Screen Type
- Click Submit
Form Page Header - Output Text
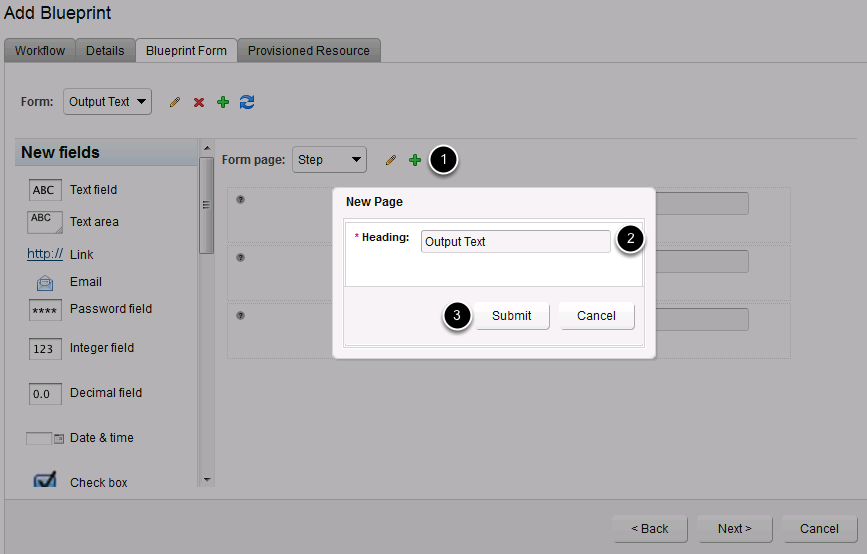
- Click the New Page (Green +) button to add a new Page to the form
- Set the Heading to Output Text
- Click Submit
Output Text Page
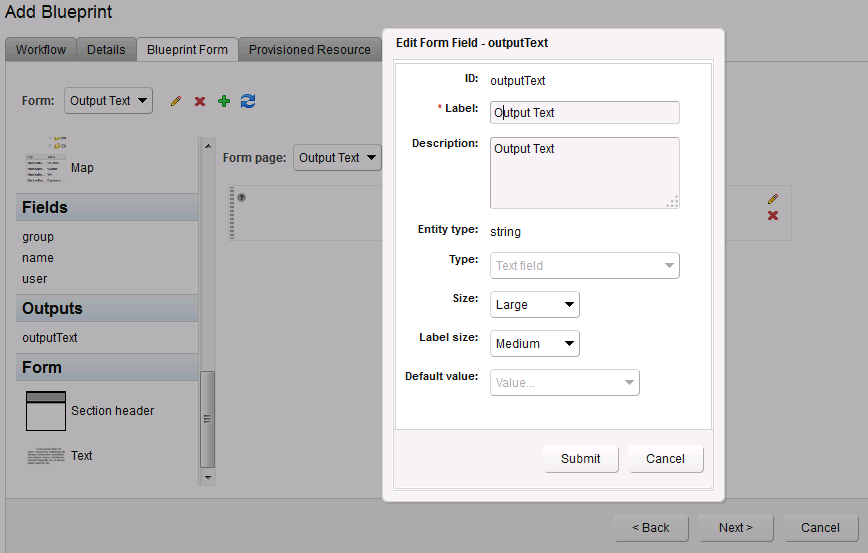
- In the left pane, scroll down until you see the Outputs section. This area will have each of your vCO workflow outputs. In our case, there is only 1.
- Drag the outputText field onto the form page, just under the “Form page” dropdown box as shown above
- Click the Edit icon (pencil)
- Update the Label to be more user friendly: Output Text
- Set Size to Large
- Click Submit
- Click Next
- On the Provisioned Resource page, there is nothing to change so click Add
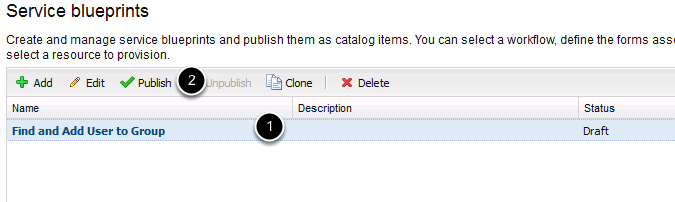
- When you return to the Service blueprints page, select the row containing your new workflow
- Click Publish
Your new vCO workflow is now published as a Catalog Item. But, in order to allow anyone to see it, we need to have it entitled. In this environment I have a “Demos” Service that already has entitlements setup so all I need to do is specify the “Demos” Service on my Catalog Item. Let’s do that now.
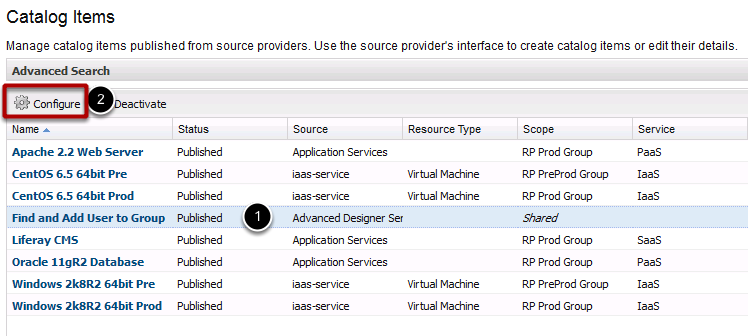
Click Administration -> Catalog Management -> Catalog Items
Select the row containing the Find and Add User to Group item
Click Configure
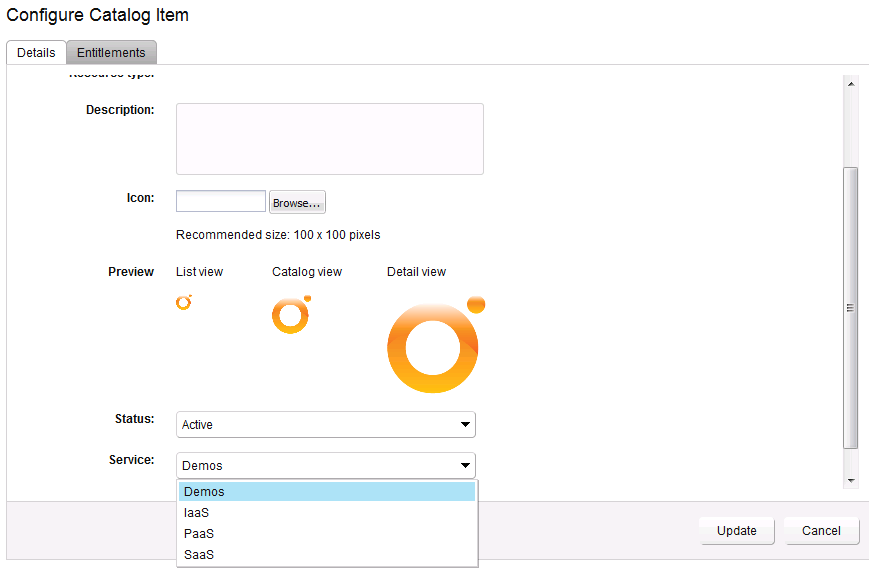
On the Configure Catalog Item page:
- Browse for and add a custom icon if desired
- Confirm that Status is Active
- Click the Service dropdown and select the appropriate Service to tie the Catalog Item to. In my case, this is the Demos service
- Click the Entitlements tab to confirm that Entitlements exist for the selected service
- Click Update when done
You are now ready to test the request via the Catalog tab!
vCAC - Catalog - Demos
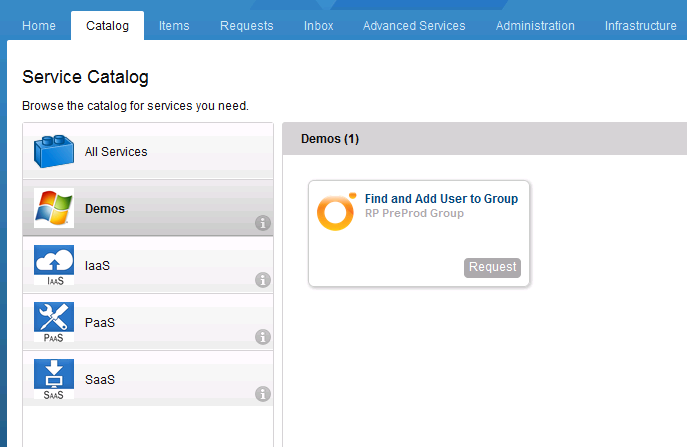
The integration should be ready to test. At this point, if necessary, log out of the admin account then login using an account that is entitled to the Service specified in the previous step. My admin account is entitled, so I will continue on with the same account.
- Click on the Catalog tab
- Select the Service (in my case Demos) from the list on the left to narrow the available requestable items (If your account is only entitled to 1 service, then your screen will not have the services listed down the side of the screen.
- Click the Request button
New Request

- Enter a valid given or surname in the name input then tab or click into the user dropdown
- After a brief moment (vCO Action running in the background), the dropdown should populate with valid AD:User accounts
- Select an account, then select an AD Group and Submit the request
- Click OK on the confirmation page
Review Requests
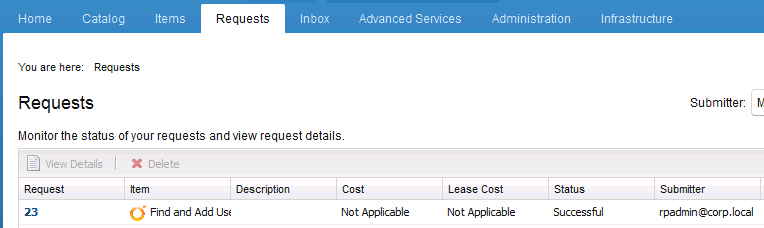
Click on the Requests tab
Locate and click on the Request Number that matches the request you just submitted. In the screenshot above, I click on the 23 at the far left of the table
Request Details
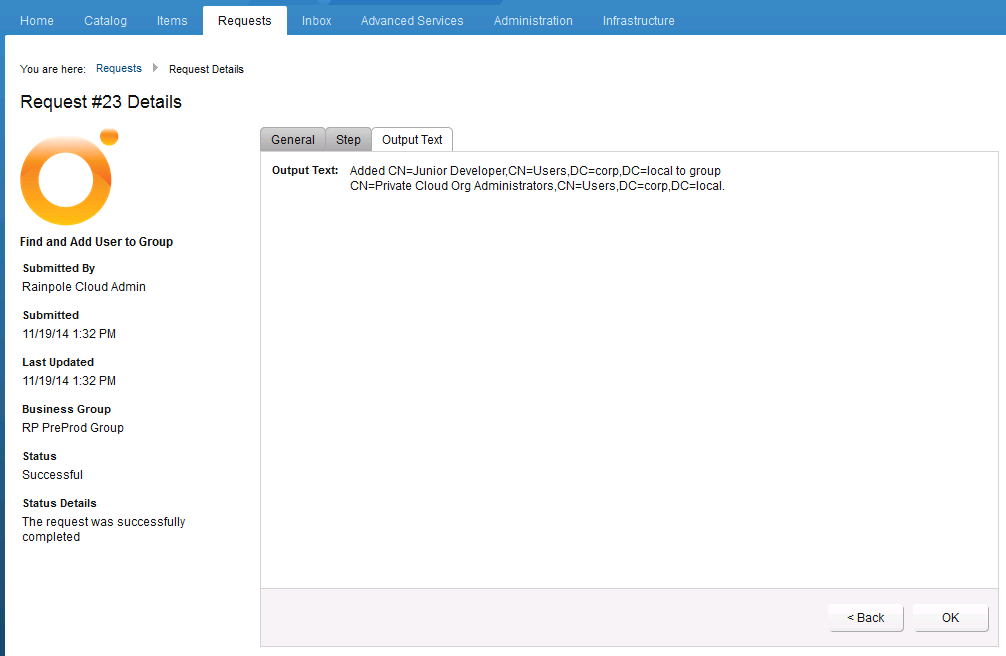
Review the General, Step, and Output Text tabs.
Next Steps
See if you can customize this process to accept multiple groups to add the user to. There was some good information here that taught reusable techniques. I hope you enjoyed this tutorial. Please share if you found it worthwhile!
