Postman + vRO = HTTP-REST Plug-in Operations
In a previous article, I stepped through the process of working with vRealize Orchestrator’s (vRO) REST API using the RestClient add-on for FireFox. This was before I was introduced to my new favorite REST client: POSTMAN! @postmanclient In this article, I’ll provide a little detail on an approach you can use to improve your work with REST APIs and consuming them with Orchestrator’s REST plug-in. Throughout the article, I will use a FreeNAS 9.3.x Virtual Appliance as my target endpoint since it is freely available, quick to setup, and has nice API documentation. Please note that the technique described here can be used for any API that Postman can access!
Environments
Postman has a cool feature that allows you to define variables called Environments. This is important with the work we do around Orchestrator as you may have a local and remote instance (or test/dev and production) of a system you wish to automate. By defining an environment variable, you can create a Collection of API Requests that can target different environments by simply selecting the environment before clicking Send when testing.
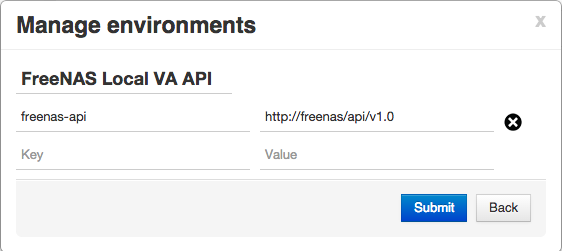
Create an Environment for the API you wish to work with. In my case, this will be for my Local FreeNAS Appliance. For the “Key” field, give it a meaningful name - I chose “freenas-api” for mine. In the value field, check your api documentation to get the root address of the API. In the case of FreeNAS, this is http://freenas-host-address/api/v1.0 so that’s what I’ll specify here. Throughout the rest of the documentation, calls for various information assume this address to be the root so give an address like /sharing/nfs/ to get a list of NFS Shares. Defining your API root address this way will make it easy to build your collection of API calls in a consistent format with the documentation.
Collections
- Create a new Collection, I named mine “FreeNAS”. This will allow you to create a “collection” of calls for a specific service, which you can then later export….
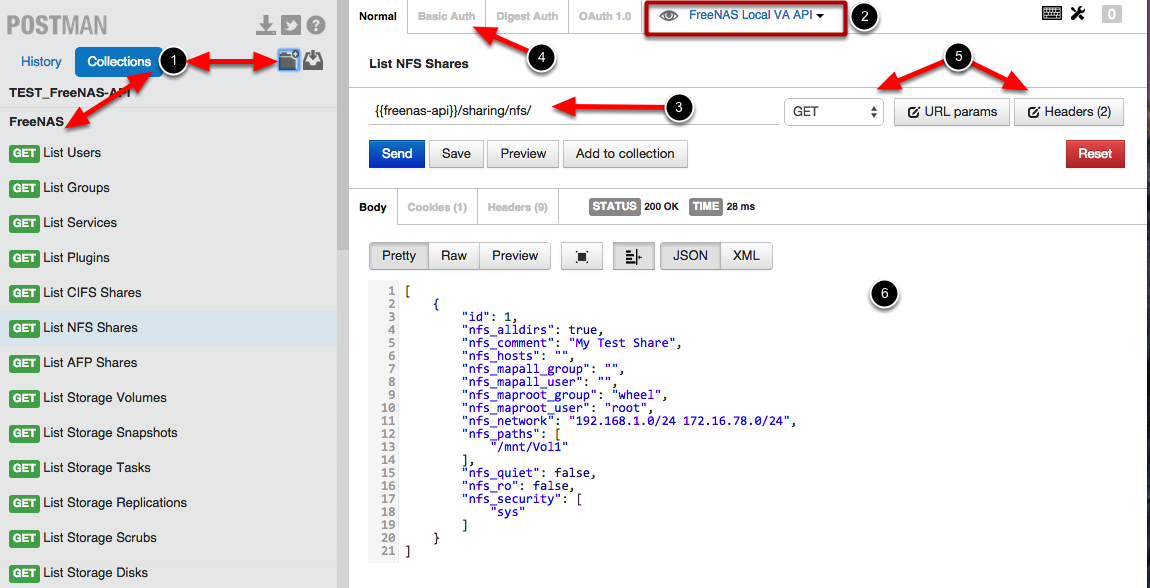
- Set the Environment by clicking the drop-down at the top of the screen, in my case, I chose the “FreeNAS Local VA API”
- Specify the API endpoint you wish to perform and operation against, making sure to use the Environment Variable you created earlier for the base address of your api. Based on the documentation, my freenas-api variable should be formatted as
{{freenas-api}}Then, add the rest of the address. In my case, I wish to list the NFS shares. According to the documentation, this is accessed via /sharing/nfs/ - Next, set your Authorization as needed by using the “Basic Auth” tab. (Note: In some cases, you can simply try to perform an operation and you will be prompted for credentials. Additionally, you may need to open a Chrome browser tab to the address you are attempting to access in order to accept SSL Certificates - particularly in the case of Self-signed or invalid certs).
- Add any Headers (if needed) by clicking the Headers button, then adding them, and select your operation type. In my case, I selected and clicked “GET”
- Now, review the output of your operation. In my case, I see that there is one NFS share available.
- Once you have adjusted your query so that it produces the desired results, click the “Add to collection” button
NOTE: When defining your URL, BEFORE adding to collection, place any url parameters inside curly braces. For example, if I had an operation to Delete an NFS Share, I would need the share ID:
{{freenas-api}}/sharing/nfs/{nfsId}
When testing the above DELETE command in Postman, I would need to replace {nfsId} with “1” to delete the “My Test Share” shown in the screenshot above. But, by adding to the collection in the format I have provided here, it will be meaningful to Orchestrator when you Invoke the operation. When invoking an Orchestrator RESTOperation that has such a value in the url, that value is interpreted as an input!
Add request to a collection
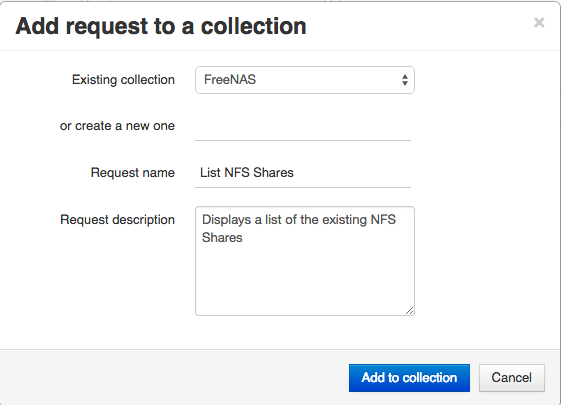
- Select the Collection you created earlier from the Existing collection drop-down or create a new one if needed.
- Provide a short, meaningful name, and optionally a description
- Click Add to collection
Continue building your collection
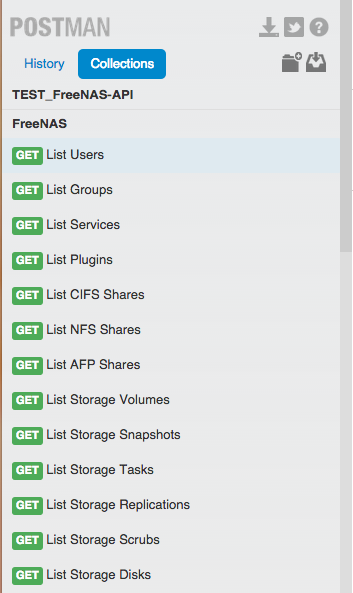
Now, repeat this process by testing and adding the various calls to the API that you need.
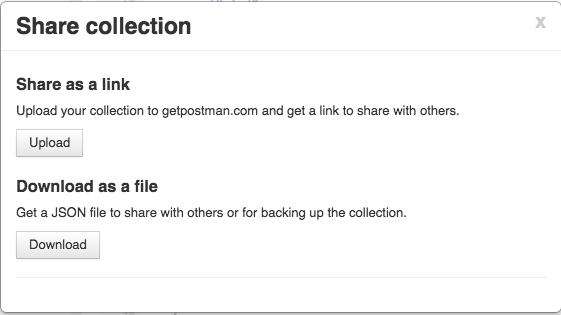
Export the collection
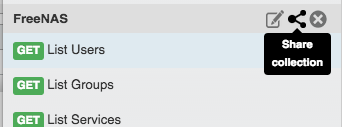
Download collection
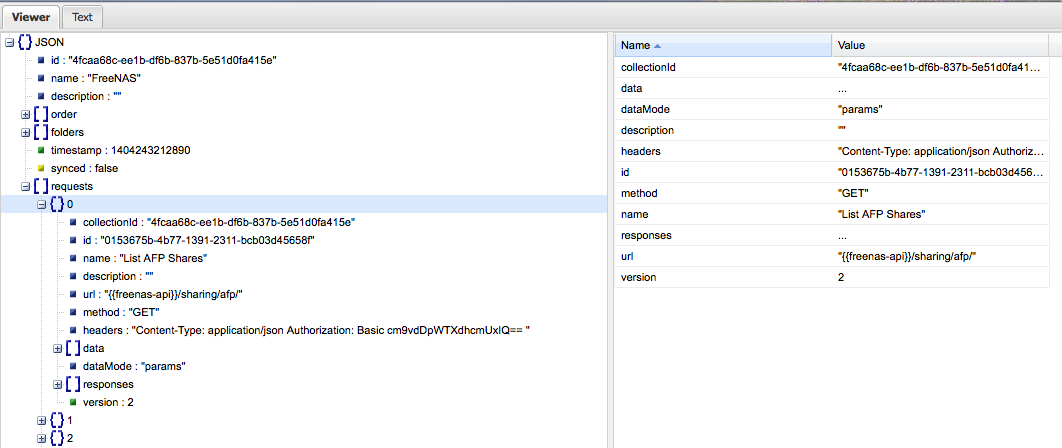
Online JSON Tools
When working with JSON, it’s good to have a few sites bookmarked or tools available. Here are a couple I use frequently:
- JSONLint <- Great for quick JSON validation
- JSONViewer <- Nice all-around tool that lets you visualize your JSON in a tree view (Screenshot shows the viewer pane)
- JSONParser <- Great online tool to beautify your json or even do some parsing
Orchestrator: HTTP-REST Plug-in

Now that you have your collection tested and exported, head over to your Orchestrator server and add a new host to the HTTP-REST plug-in.
When specifying the URL, be sure to use the same value specified when you defined your environment variable. In my case, this is: http//freenas/api/v1.0
Operations?
When you have only one or two HTTP-REST operations to define, this can be done quite easily in a manual fashion by using the workflow: Add a REST operation
However, if you’ve been building up a large collection of operations in Postman, replicating all that work into Orchestrator’s REST Plug-in in the form of Operations may not be desired.
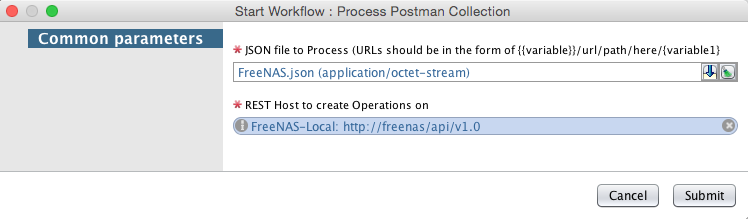
Orchestrator Workflow: Process Postman Collection

Workflow Inputs
Workflow Run
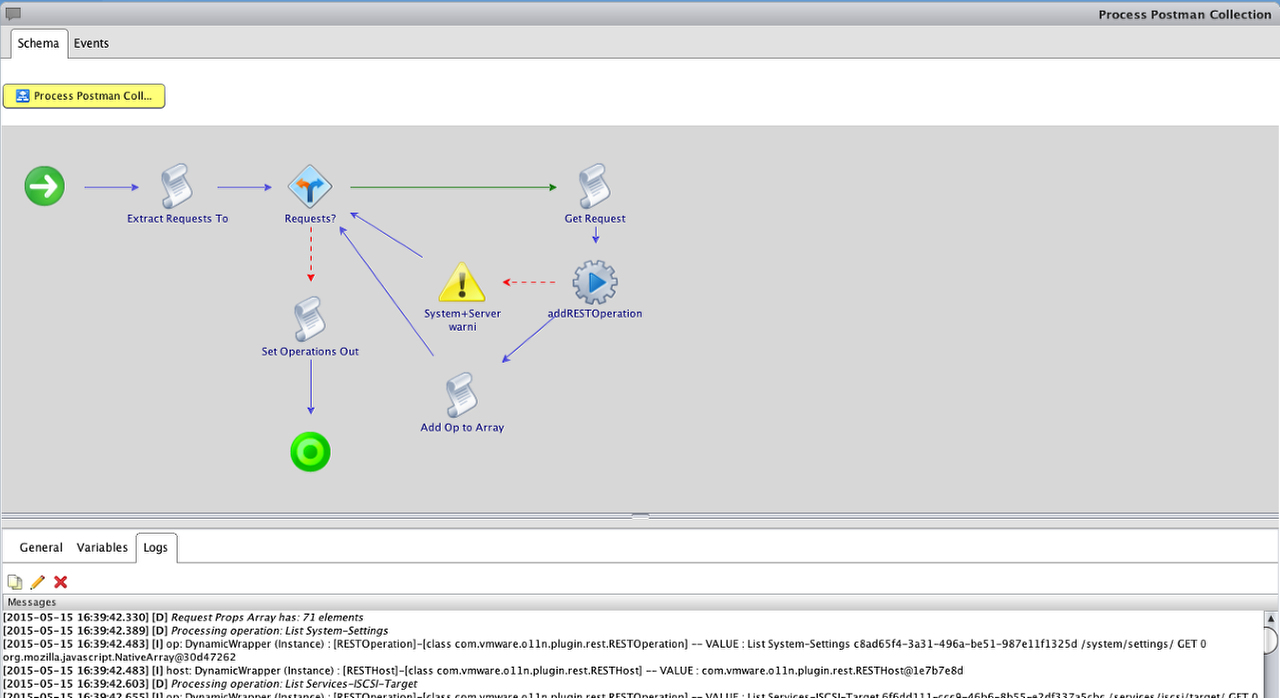
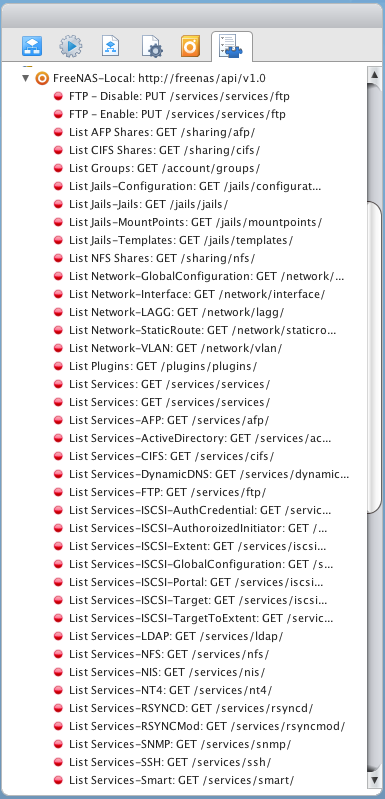
Check out your HTTP-REST Inventory now!
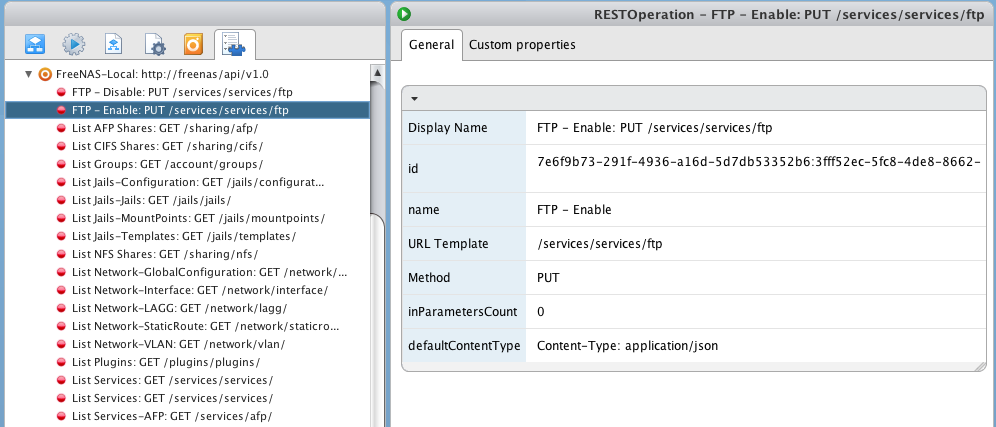
RESTOperation Details
Next Steps:
Grab the workflow and add features to it! You could potentially:
- Update the workflow so that it checks for existing operations before adding one and skips if already exists. If you run this workflow twice, you’ll end up with duplicate entries for every operation
- Update the workflow so that it UPDATES existing Operations if they already exist rather than creating duplicates or simply skipping them
- Combine the previous 2 bullet points so that you can specify whether you wish to update existing operations or just skip them
- Update the loop so that it generates workflows for each operation once the operation has been defined
- Change the workflow to prompt for Endpoint details so that it creates the RESTHost, then adds the operations to the newly created host
See the NEWLY ADDED (Sep 14, 2016) attached workflow from one of my co-workers and blog followers that adds many of these additional features!
As you get comfortable with the structure of the calls, you can clean-up and optimize them OR generate a single call capable of handling multiple different actions! This is the approach taken by Christophe in the Dynamic Types Plug-in Generator.
In addition to the Process Postman Collection workflow, I have also attached a Clear Operations workflow that will allow you to quickly and easily DELETE all RESTOperations from a given RESTHost. This may be important if you are testing or made a mess. Of course you could always just delete the RESTHost and all attached Operations will be automatically deleted.
UPDATE: Be sure to take a look at Grant Orchard’s collection noted in his article here: Postman Collection for the vRA7 API
