Enable vCenter Orchestrator (vCO) to read and write Excel files
The purpose of this article is to provide readers with instructions on how to give vCO the ability to read and write Microsoft Excel files (xls / xlsx). Yes, it is 2013 yet there are plenty of reasons why organizations might still be using an Excel spreadsheet instead of a database table.. We won't dwell on that here, instead we'll focus on providing those organizations with a step-by-step guide to provide such functionality to vCenter Orchestrator. We'll discuss two approaches here: JDBC library and PowerShell.
Pre-requisites:
- vCO 5.x Server installed and configured (using separate DB from vCenter)
- vCO may be installed on the same server as vCenter as long as it is not using the same database (IE: Simple Install of vCO 5.1) as this configuration has issues with the JDBC configuration we'll be working with
- vCO may be installed on a separate Windows server
- The vCO Appliance may be used
- You must have the ability to download and install jar files to the vCO server (and set ownership/permissions)
- vCO must be configured for read/write access for a local directory (http://pubs.vmware.com/vsphere-51/topic/com.vmware.vsphere.vco_install_config.doc/GUID-7C2CFC22-519B-4D38-84F9-00380CEB15CF.html )
- Sample Excel Spreadsheet (attached at end of article) - place the excel-vco-demo.xls file in a folder readable by the vCO service account. If using appliance, be sure to set ownership and permissions as outlined below.
Sample Package and Excel Spreadsheet:
excel-vco-demo.xls - the second worksheet (Build Info) looks like this:
| Processed | Hostname | Domain | FQDN | IP Address | Memory (GB) | CPU |
| Y | VM-001 | demo.lab | VM-001.demo.lab | 192.168.1.101 | 2 | 1 |
| Y | VM-002 | demo.lab | VM-002.demo.lab | 192.168.1.102 | 2 | 1 |
| Y | VM-003 | demo.lab | VM-003.demo.lab | 192.168.1.103 | 2 | 1 |
| Y | VM-004 | demo.lab | VM-004.demo.lab | 192.168.1.104 | 4 | 2 |
| Y | VM-005 | demo.lab | VM-005.demo.lab | 192.168.1.105 | 4 | 2 |
| VM-006 | demo.lab | VM-006.demo.lab | 192.168.1.106 | 1 | 1 | |
| VM-007 | demo.lab | VM-007.demo.lab | 192.168.1.107 | 4 | 2 | |
| VM-008 | demo.lab | VM-008.demo.lab | 192.168.1.108 | 4 | 2 | |
| VM-009 | demo.lab | VM-009.demo.lab | 192.168.1.109 | 1 | 1 | |
| VM-010 | demo.lab | VM-010.demo.lab | 192.168.1.110 | 2 | 1 | |
| VM-011 | demo.lab | VM-011.demo.lab | 192.168.1.111 | 2 | 1 | |
| VM-012 | demo.lab | VM-012.demo.lab | 192.168.1.112 | 2 | 1 | |
| VM-013 | demo.lab | VM-013.demo.lab | 192.168.1.113 | 4 | 2 | |
| VM-014 | demo.lab | VM-014.demo.lab | 192.168.1.114 | 4 | 2 | |
| VM-015 | demo.lab | VM-015.demo.lab | 192.168.1.115 | 4 | 2 | |
| VM-016 | demo.lab | VM-016.demo.lab | 192.168.1.116 | 1 | 1 | |
| VM-017 | demo.lab | VM-017.demo.lab | 192.168.1.117 | 1 | 1 | |
| VM-018 | demo.lab | VM-018.demo.lab | 192.168.1.118 | 1 | 1 | |
| VM-019 | demo.lab | VM-019.demo.lab | 192.168.1.119 | 2 | 1 | |
| VM-020 | demo.lab | VM-020.demo.lab | 192.168.1.120 | 4 | 2 |
com.vmware.coe.sqlsheet.package:
- Workflows (\PSO\Library\excel\)
- Create Excel Example File
- Process Excel vCO demo xls
- Read complete worksheet from Excel file
- Read certain columns of a worksheet from Excel file
- Invoke Script readExcelVcoDemoXls
- Actions
- com.vmware.coe.sqlsheet.getColumnNames
- com.vmware.coe.sqlsheet.readDataForColumns
- com.vmware.coe.demo.readExcelVcoDemoXls
JDBC Instructions
In order to get started, be sure that you have met the configuration requirements mentioned above in the Pre-Requisites section. Before getting started down this path, you should be aware of its limitations. Then you'll need to get some files and put them on your vCO server. Special thanks to Joerg Lew for his assistance in getting all the syntax correct in the core workflows here.
Limitations
Brief description from the project page:
Simple, POI based JDBC driver for XLS/XLSX files. Currently supports basic SELECT ( 'select *' only, w/o where clause), CREATE, INSERT operations. The driver is pure Java - no native Windows components are required. From version 6.1 streaming implemented to process large files.
Please refer to the documentation on http://code.google.com/p/sqlsheet/issues/
- The SQLSheet JDBC driver does not process WHERE clauses in SQL statements. Therefor you always get the complete table of a worksheet, and have to implement your own filter logic manually.
The provided Action “com.vmware.coe.readDataForColumns” provides an example how to filter the result set of the SQL Select query only to return data for specified columns. - It seems that the SQLSheet JDBC driver stops processing the Excel worksheet at the first empty row. So make sure all the data you want to read is stored in consecutive rows in the worksheet. (Example spreadsheet has a blank line after the tenth record to demonstrate that records 11-20 are not processed in the workflow)
- The SQLSheet JDBC driver expects the first rows containing the column names.
Download SQLSheet and Apache POI
This solution relies on the sqlSheet JDBC driver for MS Excel. The project page can be found here: http://code.google.com/p/sqlsheet/
The specific files to download are as follows:
- sqlsheet-6.3.jar and jsqlparser-0.7.1.jar from: http://code.google.com/p/sqlsheet/downloads/list
- poi-bin-3.8-20120326.zip (or .tar.gz) from http://archive.apache.org/dist/poi/release/bin/
Once the files have been downloaded, unzip the poi*.zip file. The archive file contains many different files. The only ones that are needed to support xls and xlsx file formats are:
NOTE: some of the file names listed below will have build dates in their filename
- poi-3.8.jar
- poi-ooxml-3.8.jar
- poi-ooxml-schemas-3.8.jar
- ooxml-lib/dom4j-1.6.1.jar
- ooxml-lib/stax-api-1.0.1.jar
- ooxml-lib/xmlbeans-2.3.0.jar
Install files and restart service
Now that you have all the jar files (sqlsheet, jsqlparser, and the 6 poi/ooxml files), they need to be copied to the vCO server.
All of these .jar files should be copied to the %vCO Install Directory%/app-server/server/vmo/lib/ext
Assuming default folders, the specific path would be:
- vCO Installed as part of vCenter install: c:\program files\vmware\infrastructure\orchestrator\app-server\server\vmo\lib\ext
- Standalone vCO Windows installation: c:\program files\vmware\orchestrator\app-server\server\vmo\lib\ext
- vCO Virtual Appliance: /opt/vmo/app-server/server/vmo/lib/ext
When using the vCO Appliance, make sure the new .jar files have proper permission settings and is owned by the vco user/group:
-rw-r-----
This permission may be set by executing the following two command in the folder: /opt/vmo/app-server/server/vmo/lib/ext
chown vco.vco *.jar
chmod 640 *.jar
Now that the files are in place with permissions set, restart the vCenter Orchestrator Server service (in some cases, WIndows based vCO servers may require a full reboot.
Install and use the example workflow package
Using the vCenter Orchestrator Client, import the provided package. The package will provide you with sample workflows and actions to help you get started reading/writing XLS files!
NOTE: Always make sure that the vCO Service has the proper permissions to read & write the Excel file - especially when using the vCO Appliance!
Example
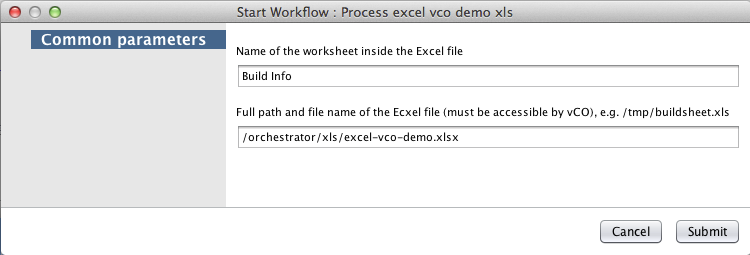
Make sure the Excel file is in a location readable by the vco service account. For my test here, I have updated my js-io-rights.conf file to give permission to the /orchestrator/xls folder of my appliance and have placed the file there.
Run the "Process excel vco demo xls" workflow:
The expected results are shown in the "Logs" tab of the workflow execution and should look like this:
[2013-03-22 09:50:36.691] [I] Processed: null
[2013-03-22 09:50:36.693] [I] Hostname: VM-005
[2013-03-22 09:50:36.694] [I] Domain: demo.lab
[2013-03-22 09:50:36.695] [I] FQDN: VM-005.demo.lab
[2013-03-22 09:50:36.696] [I] IP Address: 192.168.1.105
[2013-03-22 09:50:36.697] [I] Memory (GB): 4
[2013-03-22 09:50:36.698] [I] CPU: 2
[2013-03-22 09:50:36.798] [I] Processed: null
[2013-03-22 09:50:36.799] [I] Hostname: VM-006
[2013-03-22 09:50:36.800] [I] Domain: demo.lab
[2013-03-22 09:50:36.802] [I] FQDN: VM-006.demo.lab
[2013-03-22 09:50:36.804] [I] IP Address: 192.168.1.106
[2013-03-22 09:50:36.805] [I] Memory (GB): 1
[2013-03-22 09:50:36.806] [I] CPU: 1
[2013-03-22 09:50:36.921] [I] Processed: null
[2013-03-22 09:50:36.921] [I] Hostname: VM-007
[2013-03-22 09:50:36.923] [I] Domain: demo.lab
[2013-03-22 09:50:36.924] [I] FQDN: VM-007.demo.lab
[2013-03-22 09:50:36.925] [I] IP Address: 192.168.1.107
[2013-03-22 09:50:36.927] [I] Memory (GB): 4
[2013-03-22 09:50:36.928] [I] CPU: 2
[2013-03-22 09:50:37.102] [I] Processed: null
[2013-03-22 09:50:37.104] [I] Hostname: VM-008
[2013-03-22 09:50:37.105] [I] Domain: demo.lab
[2013-03-22 09:50:37.106] [I] FQDN: VM-008.demo.lab
[2013-03-22 09:50:37.107] [I] IP Address: 192.168.1.108
[2013-03-22 09:50:37.109] [I] Memory (GB): 4
[2013-03-22 09:50:37.111] [I] CPU: 2
[2013-03-22 09:50:37.222] [I] Processed: null
[2013-03-22 09:50:37.223] [I] Hostname: VM-009
[2013-03-22 09:50:37.224] [I] Domain: demo.lab
[2013-03-22 09:50:37.225] [I] FQDN: VM-009.demo.lab
[2013-03-22 09:50:37.226] [I] IP Address: 192.168.1.109
[2013-03-22 09:50:37.227] [I] Memory (GB): 1
[2013-03-22 09:50:37.228] [I] CPU: 1
[2013-03-22 09:50:37.348] [I] Processed: null
[2013-03-22 09:50:37.349] [I] Hostname: VM-010
[2013-03-22 09:50:37.350] [I] Domain: demo.lab
[2013-03-22 09:50:37.352] [I] FQDN: VM-010.demo.lab
[2013-03-22 09:50:37.354] [I] IP Address: 192.168.1.110
[2013-03-22 09:50:37.355] [I] Memory (GB): 2
[2013-03-22 09:50:37.357] [I] CPU: 1
PowerShell Instructions
Please note that I have very limited experience with PowerShell so my guidance here will not be as detailed as the JDBC instructions above. I do want to include this information though as it looks like it would be a far better and more flexible approach to working with Microsoft's files.
If choosing this approach, be sure to have the PowerShell plug-in installed and configured with a PowerShell Host. The following links can help provide with guidance on getting this setup
PowerShell Plug-in documentation / vCO PowerShell plug-in blog post
Special thanks to my colleague Bill Call for pointing me in this direction.
For this solution, you'll need to install the Microsoft Access Database Engine 2010 Redistributable package on your PowerShell Host. Since I used my vCO Server also as the PowerShell host, I downloaded the 64-bit executable since my server is Windows 2008 R2 x64.
http://www.microsoft.com/en-us/download/details.aspx?id=13255
That package will allow PowerShell to make calls to the needed Providers for the following code to work. An idea of the .ps1 script I tested with is below. It was modified after being imported as an action to allow the workflow to have an input that specifies the Excel version as 2003 (Excel 8) or 2007+ (Excel 12):
|
|
Example
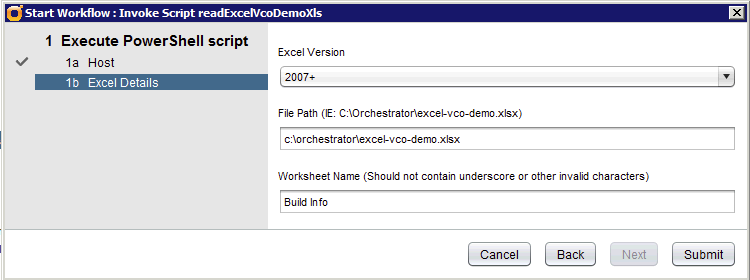
Run the "Invoke Script readExcelVcoDemoXls" workflow, select your PowerShell Host and click Next.
Fill in the form using the correct path to your copy of the excel-vco-demo.xlsx file
Here's te expected output in the Logs tab of the workflow execution:
[2013-03-22 16:10:28.933] [D] Invoke command in session fa9092e4-137c-4435-a14a-7d80d4760f57
[2013-03-22 16:10:30.460] [I] Hostname=VM-001 Domain=demo.lab FQDN=VM-001.demo.lab IP Address= Memory=2 CPU Count=1 Processed=Y
Hostname=VM-002 Domain=demo.lab FQDN=VM-002.demo.lab IP Address= Memory=2 CPU Count=1 Processed=Y
Hostname=VM-003 Domain=demo.lab FQDN=VM-003.demo.lab IP Address= Memory=2 CPU Count=1 Processed=Y
Hostname=VM-004 Domain=demo.lab FQDN=VM-004.demo.lab IP Address= Memory=4 CPU Count=2 Processed=Y
Hostname=VM-005 Domain=demo.lab FQDN=VM-005.demo.lab IP Address= Memory=4 CPU Count=2 Processed=Y
Hostname=VM-006 Domain=demo.lab FQDN=VM-006.demo.lab IP Address= Memory=1 CPU Count=1 Processed=
Hostname=VM-007 Domain=demo.lab FQDN=VM-007.demo.lab IP Address= Memory=4 CPU Count=2 Processed=
Hostname=VM-008 Domain=demo.lab FQDN=VM-008.demo.lab IP Address= Memory=4 CPU Count=2 Processed=
Hostname=VM-009 Domain=demo.lab FQDN=VM-009.demo.lab IP Address= Memory=1 CPU Count=1 Processed=
Hostname=VM-010 Domain=demo.lab FQDN=VM-010.demo.lab IP Address= Memory=2 CPU Count=1 Processed=
Hostname= Domain= FQDN= IP Address= Memory= CPU Count= Processed=
Hostname=VM-011 Domain=demo.lab FQDN=VM-011.demo.lab IP Address= Memory=2 CPU Count=1 Processed=
Hostname=VM-012 Domain=demo.lab FQDN=VM-012.demo.lab IP Address= Memory=2 CPU Count=1 Processed=
Hostname=VM-013 Domain=demo.lab FQDN=VM-013.demo.lab IP Address= Memory=4 CPU Count=2 Processed=
Hostname=VM-014 Domain=demo.lab FQDN=VM-014.demo.lab IP Address= Memory=4 CPU Count=2 Processed=
Hostname=VM-015 Domain=demo.lab FQDN=VM-015.demo.lab IP Address= Memory=4 CPU Count=2 Processed=
Hostname=VM-016 Domain=demo.lab FQDN=VM-016.demo.lab IP Address= Memory=1 CPU Count=1 Processed=
Hostname=VM-017 Domain=demo.lab FQDN=VM-017.demo.lab IP Address= Memory=1 CPU Count=1 Processed=
Hostname=VM-018 Domain=demo.lab FQDN=VM-018.demo.lab IP Address= Memory=1 CPU Count=1 Processed=
Hostname=VM-019 Domain=demo.lab FQDN=VM-019.demo.lab IP Address= Memory=2 CPU Count=1 Processed=
Hostname=VM-020 Domain=demo.lab FQDN=VM-020.demo.lab IP Address= Memory=4 CPU Count=2 Processed=
Sample Files:
 excel-vco-demo.xlsx